Most adjudication platforms force you to look up claims one at a time. This slows down your team, frustrates pharmacies and members, and leads to inefficiencies. The Claim Activity module under the Claims module revolutionizes how you track, manage and search for claims. It provides you with a real-time view of the adjudication process as the claims are submitted. This helps you save time, boost efficiency, and empower your team.
This guide demonstrates how you can make the most of the Claim Activity dashboard.
Opening the Claim Activity Module
To open the Claim Activity screen:
- Click on the Claim in the left navigation menu.
- Select Claim Activity from the dropdown.
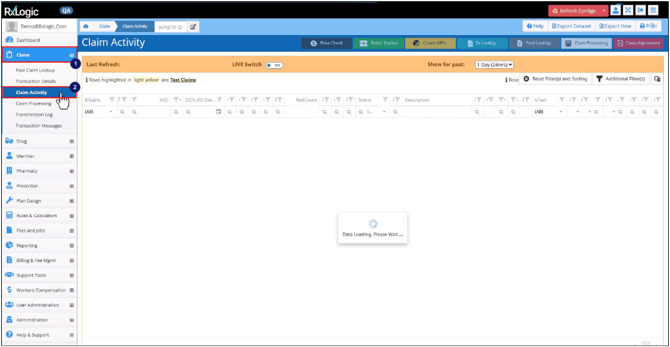
The Claim Activity interface will appear on the screen with a grid displaying all the claims submitted within the last 24 hours.
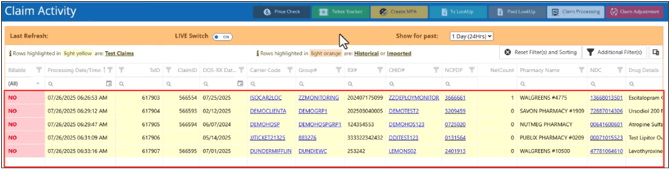
Select a Different Lookback Period
You can view the claims submitted within a specific period as follows:
- Click on the Show for Past dropdown list in the top header.
- Select a time period you want to see the claims for.
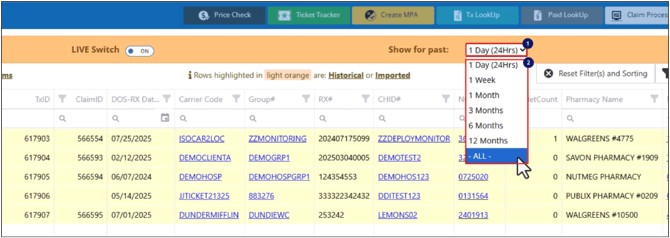
Selecting “All” will display all claims. Please note that this may take some time to load, depending on the number of claims stored in the system.
Turn Live Switch On/Off
By default, the Live Switch is set to On. This ensures that the grid updates automatically with newly submitted claims every 10 seconds. To turn it off or on (if it is switched off), click on the Live Switch toggle in the top bar.
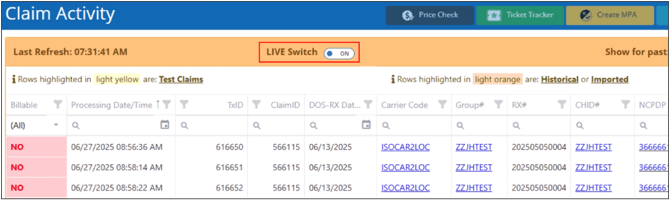
When there is no activity on claims for several minutes, the Live Switch toggle automatically switches off, and the claim activity’s auto update functionality gets disabled.
When you click on a claim in the grid, the Live Switch toggle automatically switches off, and the claim activity’s auto update functionality gets disabled.
Also, the header color switches to white from orange when the Live Switch is off.
View Last Refresh Time
In the top-left corner of the screen, the last refresh time is displayed. This shows when the grid was last updated with new claims.
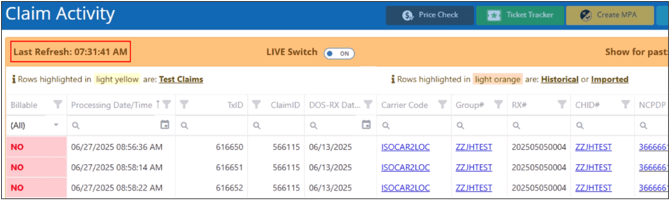
Find the Number of Claims Added in Each 10 Second Interval
The blue circles on the top-right corner of the screen indicate the number of claims added in the last 10, 10-second intervals since the last grid refresh. The leftmost circle represents the most recent interval.
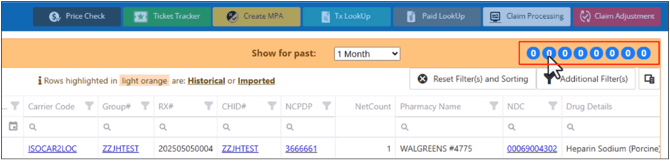
Claim Types
The Claim Activity grid contains live, test, imported and historical claims.
The test claims are highlighted in yellow, while historical and imported claims are highlighted in orange.
The live claims are unhighlighted.

Show or Hide Specific Claim Types
- Click on the Additional Filters field in the top right corner.

- Choose the desired options on the Additional filter popup window.
- Click on Apply Filter.
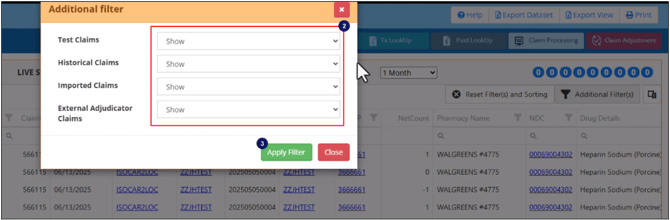 The grid will be updated according to the chosen options.
Reset Filters and Sorting
Select the Reset Filters and Sorting option to remove all configured filters and switch the lookback period back to 24 hours.

Claim Activity Grid
The claim activity grid displays the claims submitted within the selected time period. You can perform various actions on this grid, which are demonstrated as follows:
View More Columns
Scroll to the right to view additional columns and claim details.
Hyperlinks
Click on the carrier code and group# hyperlinks to view the associated record’s management screen, where you can edit and view its configuration.
Click on the CHID# hyperlink to view the associated member’s member screen, where you can edit and view its configuration.
Click on the NCPDP and NDC hyperlinks to view the associated pharmacy and drug information.
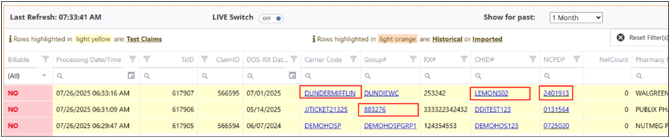
For example, clicking on the Carrier Code hyperlink will open the associated carrier’s management screen in a new tab, while choosing the Cardholder ID (CHID) hyperlink will open the associated member’s screen.
Show or Hide the Columns
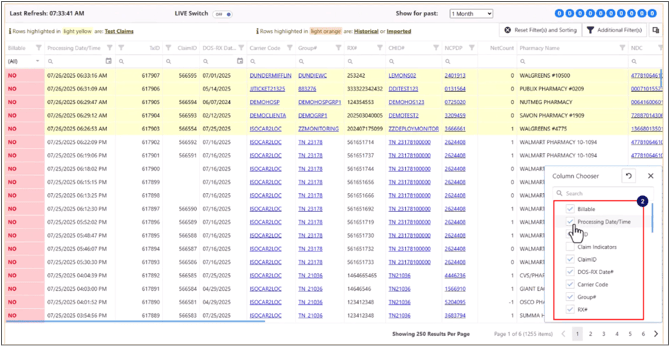
- Select the Column Chooser icon in the top right corner to show or hide the Column Chooser panel.

- Use the check boxes to display or hide specific columns on the claim activity grid.
Rearrange the Columns
Click and drag the column header to the desired position in the grid.
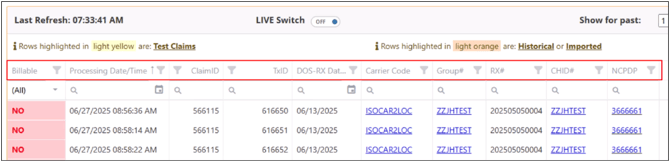
You can also sort, filter and search the claim activity grid from different options available in column headers.
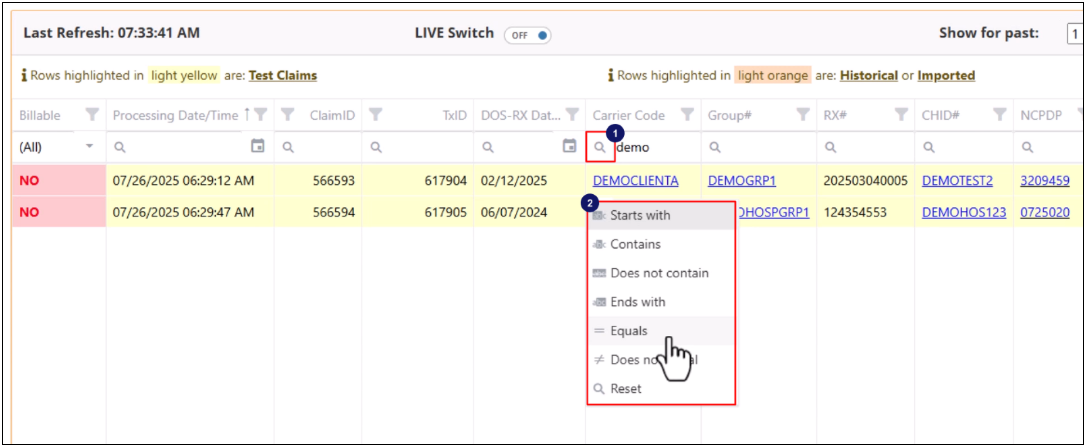
Specify a Different Search Operator
- Select the magnifying glass icon on the left side of the search field.
- Choose an option from the dropdown list.
Switch to a Different Page
You can switch to a different page using the page numbers in the bottom right corner.

Transaction Details Panel
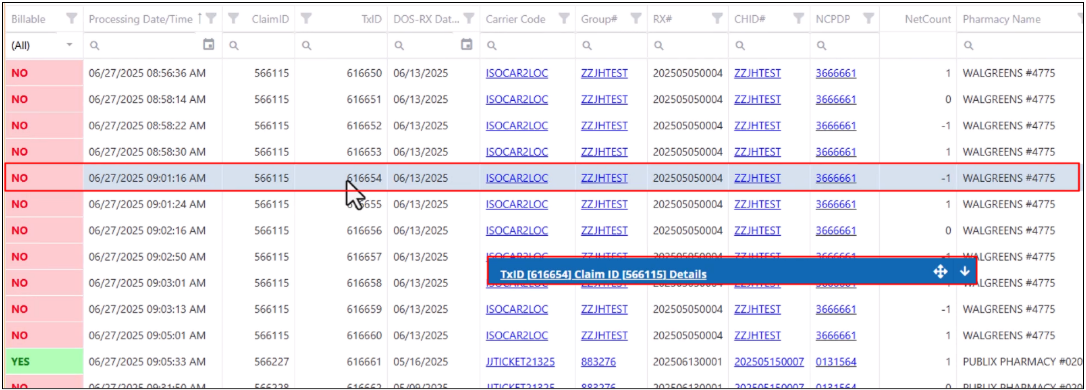
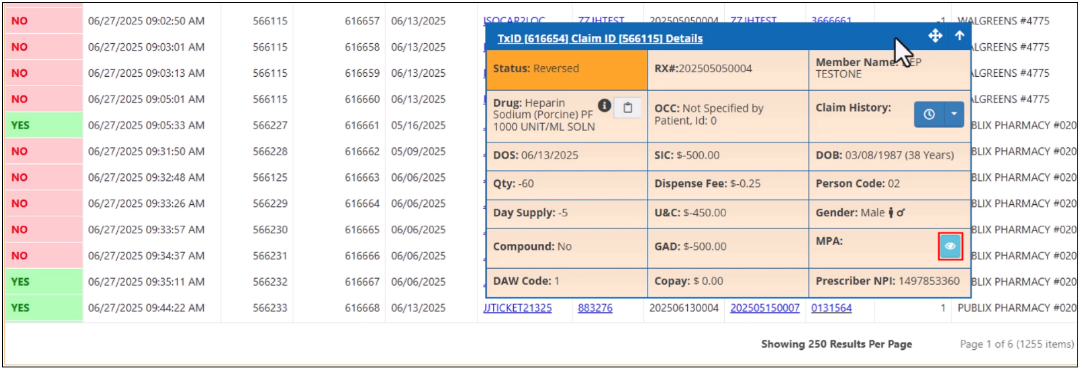
The Transaction Details panel provides specific transaction details, such as quantity, day supply, drug information and status, submitted U&C, GAD and SIC values, and member details, regarding a selected claim. Along with links to the members MPA and claim history.
Open Transaction Details Panel
Select a claim from the grid to highlight it in blue and view its details panel.
Show/Hide Panel
Click on the arrow on the right side of the claim detail panel’s title bar to show or hide the panel.

Reposition the Panel
To move the panel, click anywhere on the panel, hold and drag the panel to the desired position.
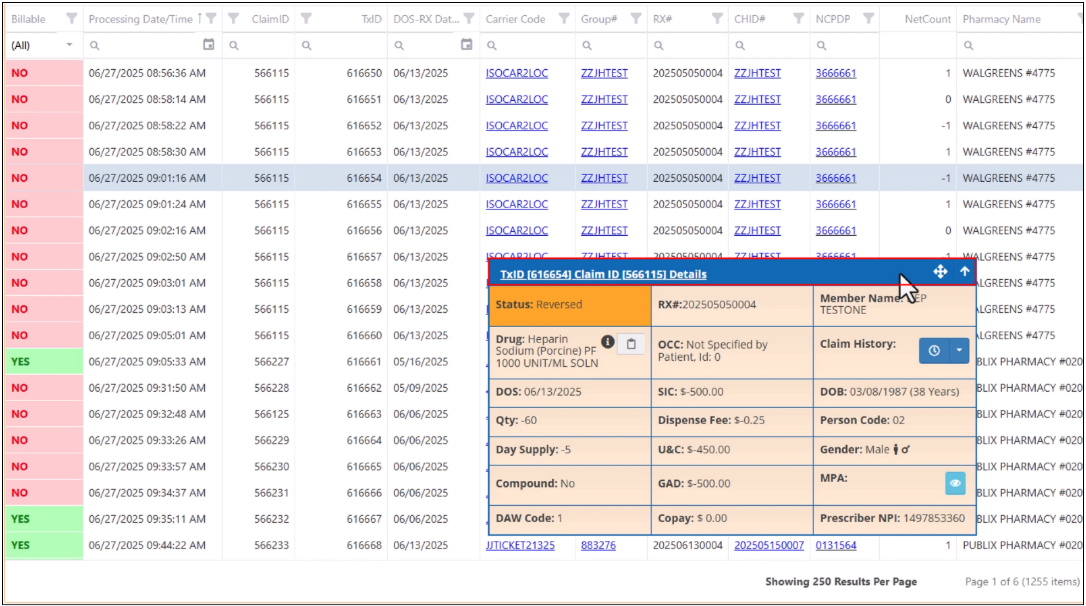
View Additional Info
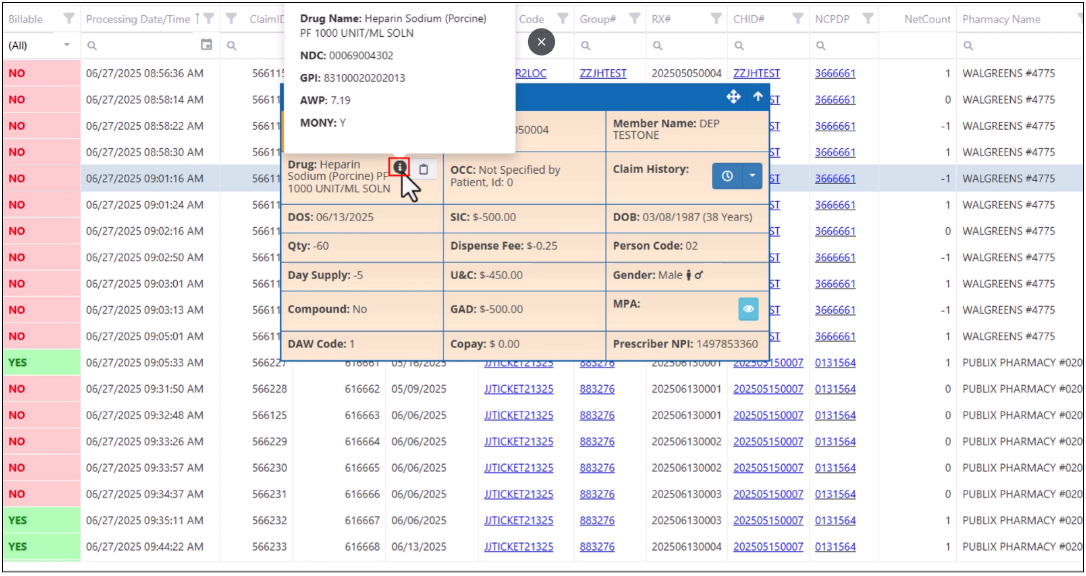
By hovering over the info icon, you can view the drug’s NDC, GPI, average wholesale price and money code.
Open Claim History
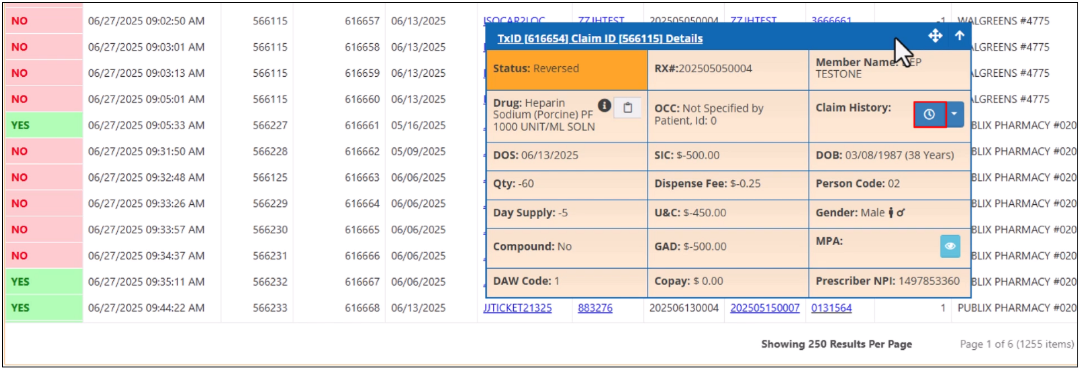
By clicking the Clock icon, you can access the member’s claim history.
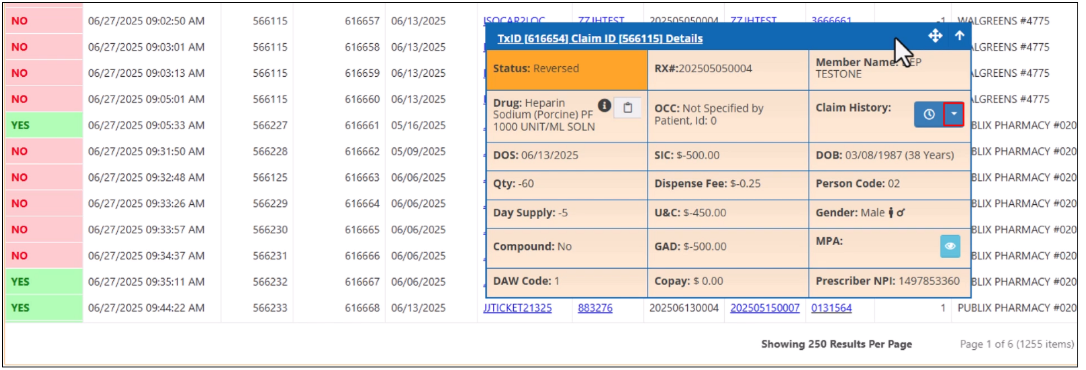
Use the arrow to filter the member’s claim history based on the drug’s NDC or GPI code.
View Member Prior Authorizations (MPAs)
To view a member’s prior authorizations, click on the Eye icon in the MPA field.
Claim Activity Action Buttons
When a claim is selected, the buttons in the Claim Activity screen’s header get enabled. These buttons allow you to send the selected claims information to other areas of the application where you can check pricing, create a ticket in ticket tracker, create MPAs and perform other actions with the selected claim’s details already filled-in.
Claim Adjustment Screen
The Claim Adjustment screen allows you to modify the values for pharmacy pricing, client billing, and plan accumulators, as well as update the claim’s pay-to details. This screen can only be accessed via the Claim Activity screen.

Create New MPA
The Create MPA button opens up the MPA Manager create MPA screen with the selected claims details already filled-in.

By default, the Create MPA button uses the drug’s GPI number.
You can also select the arrow and then select Create MPA by NDC to use the drug’s NDC number in the new MPA configuration.

View Transaction Details
By clicking the Tx Lookup, you can open the claim in the Transaction Details screen.

View Paid Claim
Click on the Paid Lookup to open the Paid Claim Lookup screen.

Send to Claim Processing
The Claim Processing option opens the Claim Processing screen with the selected claims details filled-in.

Miscellaneous Options
The following are some miscellaneous actions that you can perform in the application:
Access Help
The Help button in the top right corner of the screen takes you to the knowledge center.

Export Claims Data
To export claims data to an Excel file, click on the Export Dataset option.

Export Grid View
To export the grid view to an Excel file, click on the Export View option. The exported file includes only the data shown in the columns as they appear on the screen.

Print Data
Click on the Print option to open the print dialog box.

What would you like to learn about next?