This guide shows you how to create a carrier record using RxLogic Plan Design module.
Open Carrier Manager
To open the Carrier Manager screen:
- Click on the Plan Design in the left navigation menu.
- Select Carrier Manager from the dropdown.
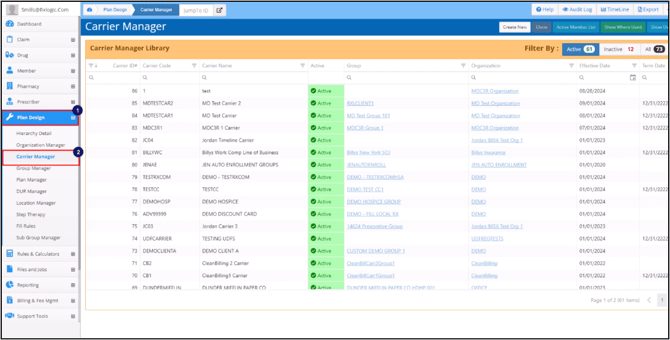
The Carrier Manager and Carrier Manager Library will appear on the screen.
Create a New Carrier Record
To create a new carrier record, click on the Create New button in the Carrier Manager header.
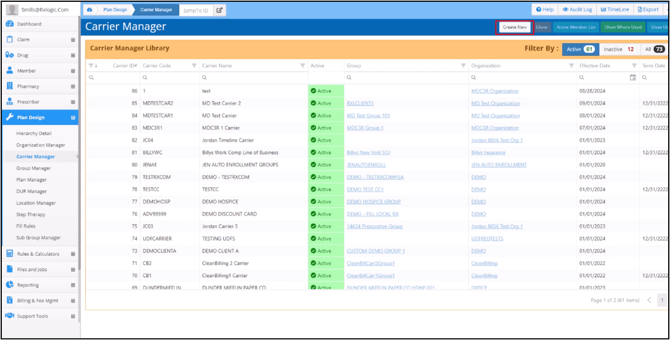
The Create New Carrier Manager screen will be displayed.
This screen has multiple tabs, i.e., Carrier Info, Group Management, Adjuster Management, Notes and Attachments.
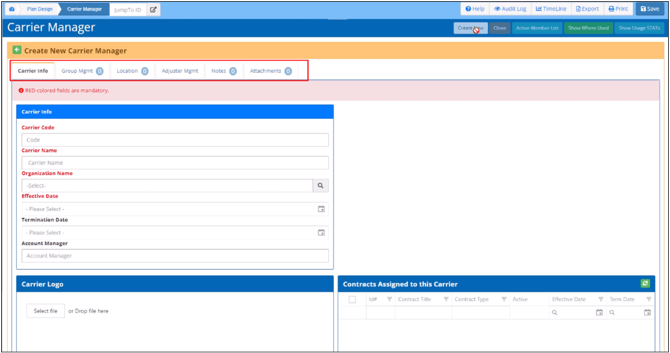
To continue, you need to fill in all the required fields in all tabs as follows:
Carrier Info
- Enter the Carrier Code in the Carrier Code field.
Note: The Carrier Code field can have fifteen characters at most.
Carrier records have carrier codes because there is an adjudication option on groups that allows the pharmacy to submit the carrier code in the group adjudication field. - Enter the Carrier Name.
- Select the organization associated with the carrier using the lookup window in the Organization Name field.
A carrier can have only one organization associated with it, but an organization can be associated with multiple carriers. - Enter or select the Effective Date of the carrier.
You can either select the dates via the calendar or enter them manually in mm/dd/yyyy format. - Enter the Carrier’s Termination Date (Optional).
When left blank, the record is considered active from the Effective Date forward. - Enter the Account Manager information if applicable.
- Click on the Save button to save the new carrier record.
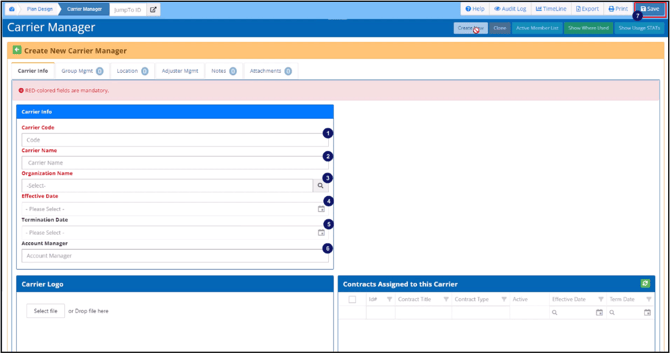
Once saved, the Update Carrier Manager header will include the Carrier Record’s name and system-generated unique ID number.
Add Contact Record
- To add a Contact Record to the Carrier Record, click the Plus (+) sign in the right corner of the Contact header.
This opens the Add/Edit Contacts section. - Enter the title, name, phone, fax and email in the corresponding fields. Please note that these are the optional fields, hence, you can enter as much or as little information as needed.
- Click on the Add button.
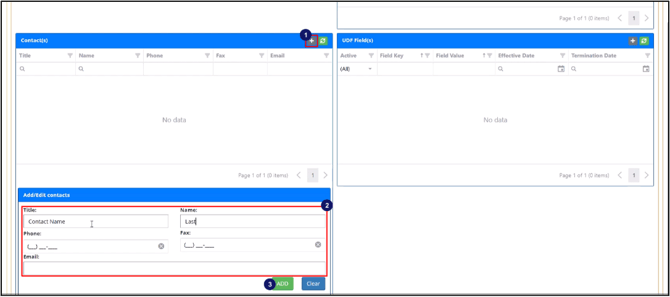
The contact record will be displayed in the Contact section. Repeat the same process to add additional contacts.
Add Address Record
- To add an address record to the Carrier Record, click on the Plus (+) sign in the right corner of the Address header.
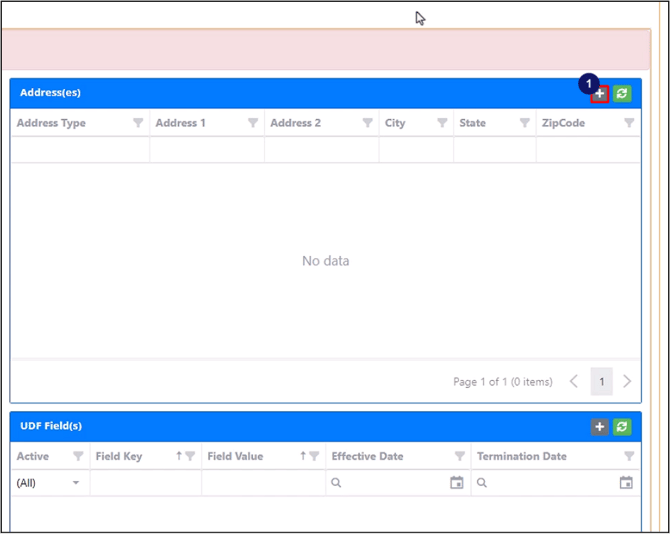
This opens the Add/Edit Address section.
- Select an address type from the Address Type dropdown menu.
- Select a state.
- Enter applicable information into the Address 1, 2, City, and Zip Code fields. These fields are all optional. Enter as much or as little information as you need.
- Click on the Add button.
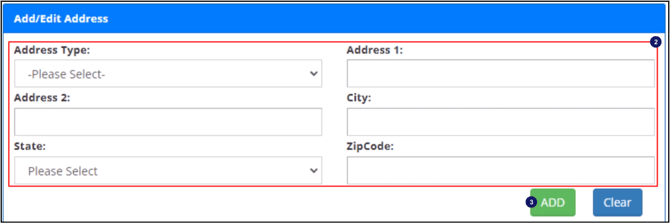
The address record will be displayed in the Address section. Repeat the same process to add additional addresses.
Add UDF Field Record
- To add a UDF Field Record, click on the Plus (+) sign in the right corner of the UDF Field header.
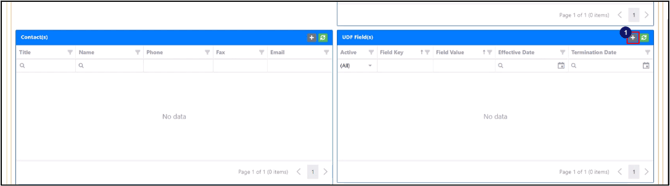
- Select a UDF Key from the Key dropdown menu.
- Select a value type from the Value dropdown menu.
- Enter the effective date in the Effective Date field.
- Enter the termination date in the Termination Date field (Optional).
- Click on the Add button.
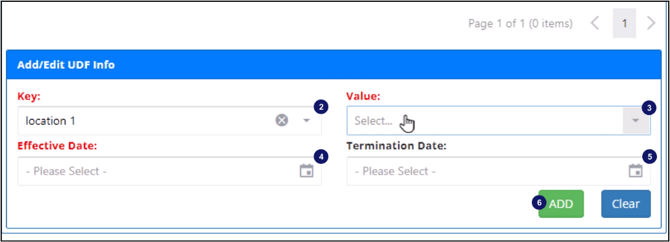
The UDF key record will be displayed in the UDF Field section. Repeat the same process to add the additional UDF fields.
Add Carrier Logo
A logo can be attached to the Carrier record in the Carrier Logo section.
- Click on the Select File button to browse the file or drag and drop the file into the Carrier Logo section.
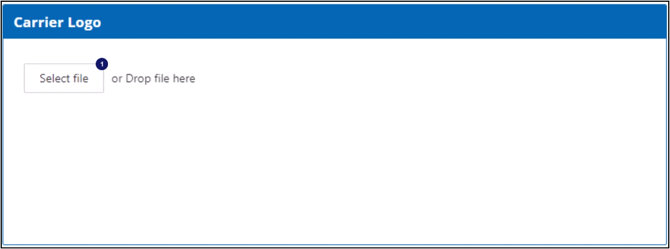
A preview window will display the loaded logo in the Carrier Logo section. - Click Save in the upper right corner to save the logo to the carrier record.
Remove Carrier Logo
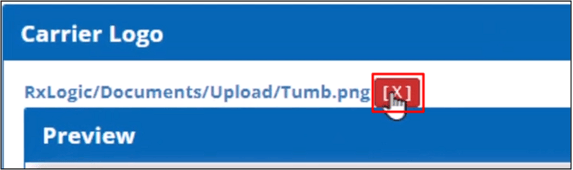
To remove the logo, click on the X icon beside the logo file name.
Carrier Configuration Options
The Carrier Configuration Options section provides you four toggle options:
- Medicare Part D Carrier
- Allow Carrier Effective Dates to Update Group Effective Dates.
- Manage Billing for Associated Groups.
- Sync Dependent Enrollments to Primary.
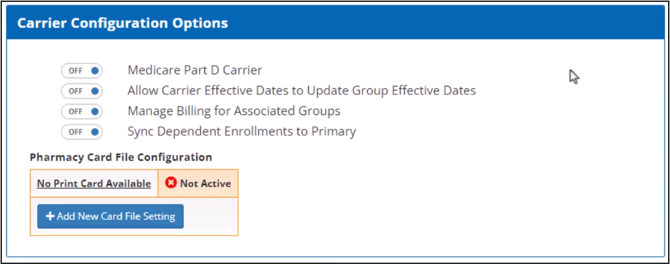
Moreover, the Pharmacy Card File configuration for the Carrier Record is displayed in the Carrier Configuration Options section.
Add a New Pharmacy Card File
- Click on the Add New Card File Setting button.
- Select a card template from the dropdown list.
- Click on the Plus (+) sign in the right corner of the Associated Carriers header.
This opens the Create New Print Card Carrier Entities box. - Click on the lookup button to the right of the Entity Name field to open the Carrier Library.
- Locate the carrier in the Carrier Library grid and click on the line.
This will populate the Entity Name field on the Create New Card Carrier Entities box. - Enter the effective date and end date.
- Click on the Add button to add the selected carrier to the Card Template you selected.
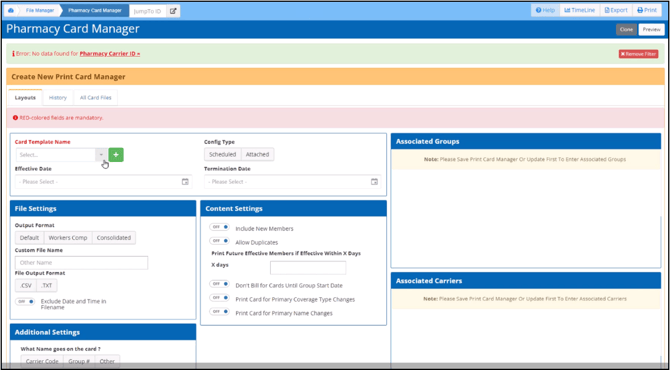
- Now, return to the browser tab with the Carrier Manager screen and refresh the browser.
You will see the Card Template name and Active Status on the Carrier Record.
Auto Ticketing
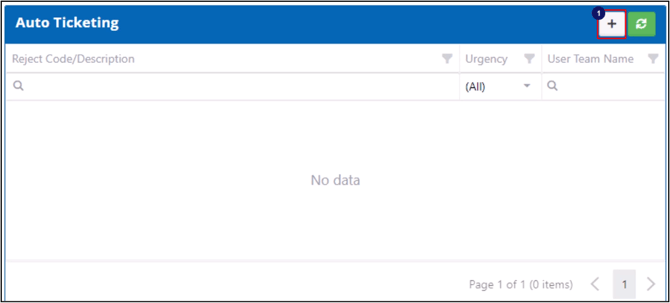
The Auto Ticketing section allows you to have tickets automatically generated in the ticketing system for rejected claims when they occur. This can be set up for all or specific reject codes.
- Click on the Plus (+) icon in the upper right corner of the Auto Ticketing header.
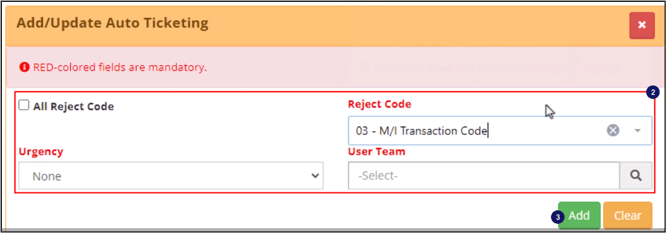
- Select a reject code from the dropdown list.
- Select an option from the Urgency dropdown.
- Click on the Lookup button in the User Team field.
- Select a user team from the User Teams Library.
- Click Add to add the Auto-Ticketing option to the carrier record.
The auto-ticketing options will appear in the Auto-Ticketing section. Repeat the same steps to add auto-ticketing for each reject code.
Contracts Assigned to this Carrier
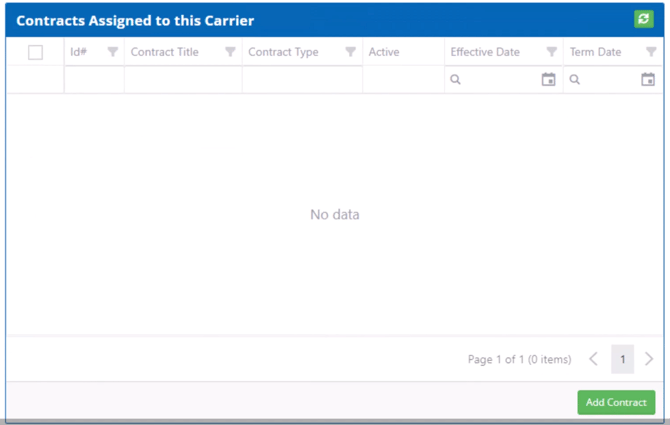
This section displays contracts from the Contract Manager associated with the carrier record.
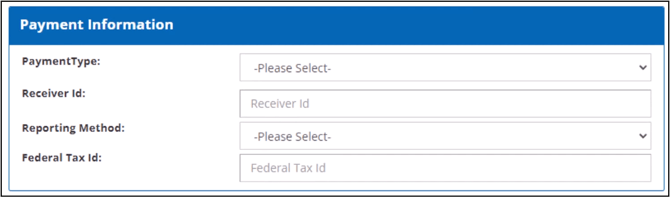
Payment Information
This section only supports Payables when payments are made to the Carrier instead of a center or pharmacy.
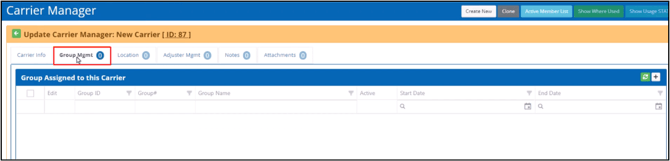
Group Management
This tab shows the number of groups associated with the carrier record. Groups are associated with the carriers with specific date ranges. A group can be associated with more than one carrier simultaneously, but association’s start and end dates cannot overlap.
Associate a Group to the Carrier Record
-
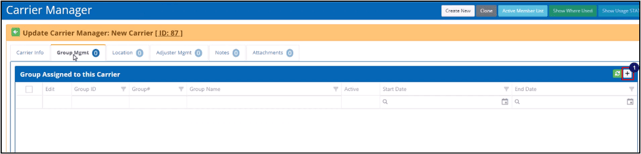
Click on the Plus (+) icon in the right corner of the Group Assigned to this Carrier header.
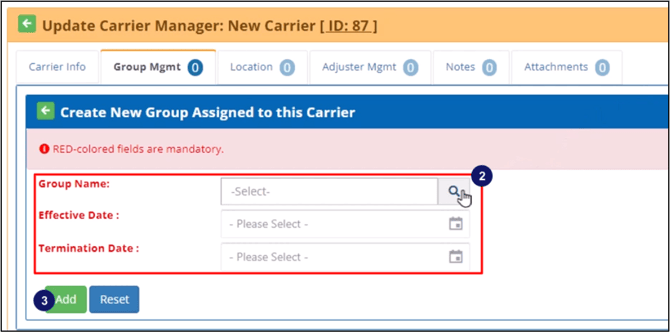
This opens the Create New Group Assigned to this Carrier box.
- Click on the look-up button on the right side of the Group Name field.
This will open the Group Library window. - Select a group to associate with the carrier.
- Enter the effective date of the group’s association with the Carrier Record in the Effective Date field.
- Enter the termination date of the group’s association with the Carrier Record in the Termination Date field (Optional).
- Click Add.
All groups associated with the carrier record will be displayed in the Group Assigned to this Carrier grid.
Adjuster Management
This tab shows the number of adjuster records assigned to the carrier record. This is used with the workers’ compensation lines of business.
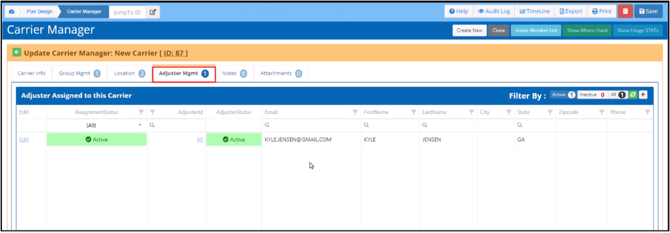
Attach an Adjuster to the Carrier Record
- Click on the Plus (+) icon in the right corner of the Adjuster Assigned to this Carrier header.
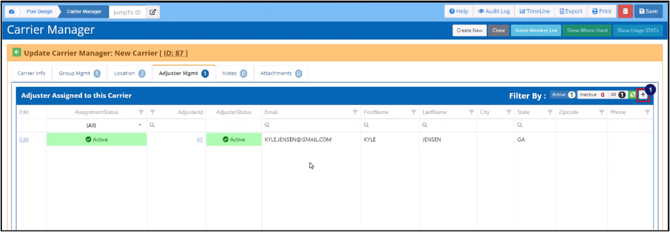
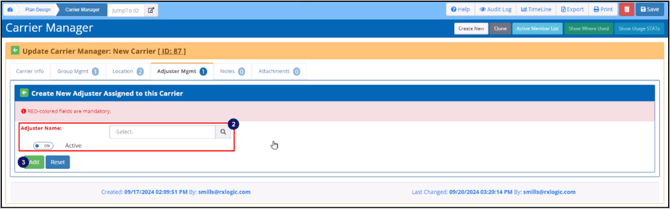
This opens the Create New Adjuster Assigned to this Carrier screen. - Click on the Lookup button in the right corner of the Adjuster Name field.
This opens the Adjuster Manager library grid.
Locate the adjuster record you want to associate with the carrier records and click anywhere on the line of the adjuster record.
The Adjuster Name field will be populated. - Click on the Add button.
This opens the Adjuster Assigned to this Carrier screen. Repeat the same process to add additional adjusters to the carrier.
Notes
The Notes tab displays the number of notes attached to the carrier record. Clicking on the Notes tab opens the Notes Timeline screen.
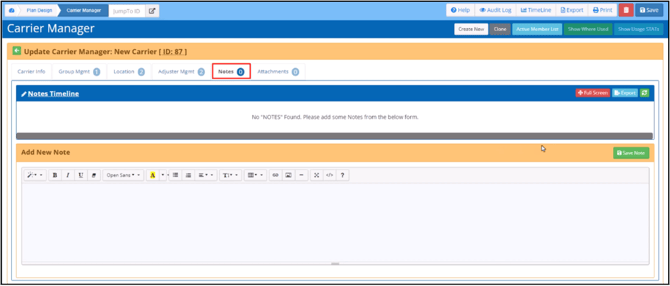
Add New Note
- Click in the grey area on the Add New Note section and enter the information for the note in this section.
- Click on the Save button.
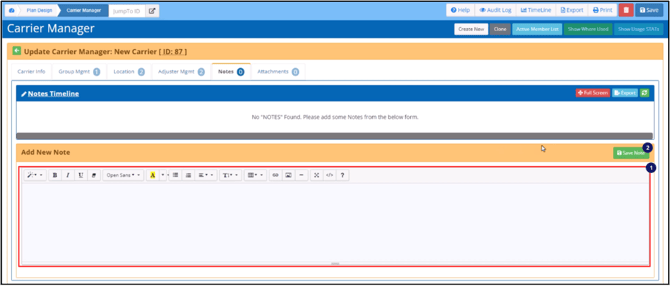
The note will appear in the Notes Timeline section with a heading showing the user who added it with the data and time.
Edit/Delete Notes
Each note can be edited or removed if the user has the permissions to do so. The buttons in the right corner of the individual note’s header allow this.

View Notes in Full Screen
Click on the Full Screen button in the right corner of the Notes Timeline header to view notes in full screen.

Export Notes
The notes in the Notes Timeline can be exported by clicking on the Export button in the right corner of the Notes Timeline header.

Attachments
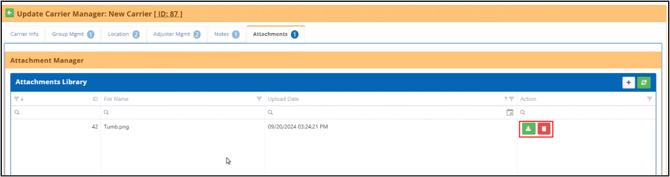
The Attachments tab displays the number of attachments attached to the carrier record. Clicking on the Attachments tab opens the Attachment Manager – Attachment Library.
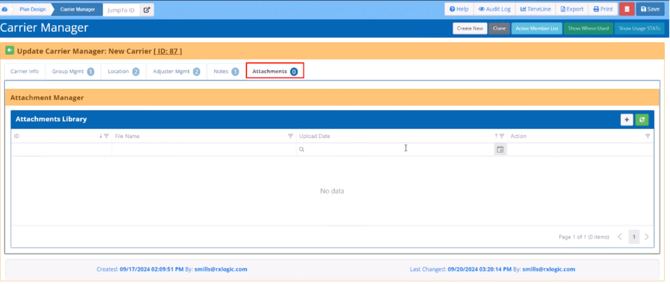
Add Attachments
- Click on the Plus (+) icon in the right corner of the Attachments Library header.
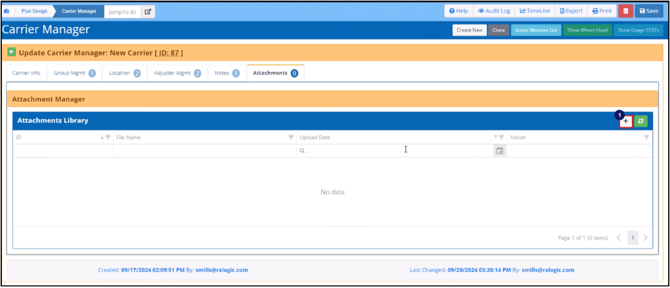 This opens the Create Attachments box.
- Click Select File or drag and drop the file in the Create Attachments section.
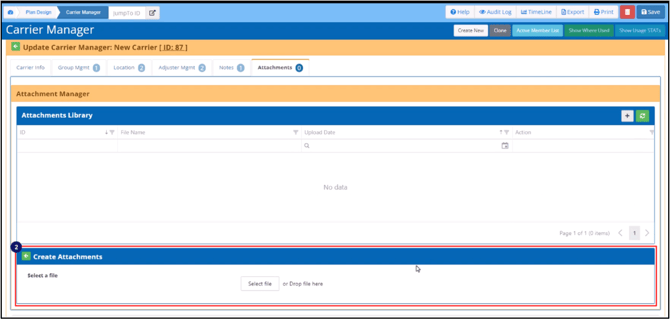
After loading, the attachment will appear in the Attachments Library. Each loaded attachment has a unique ID number.
Download or Delete Attachments
To download an attachment, click on the Download button in the Action column.
To delete an attachment, click on the Delete button in the Action column.
What would you like to learn about next?