Open Formulary Manager
To open the Formulary Manager screen:
- Click on Drug in the left navigation menu.
- Select Formulary Manager from the dropdown.
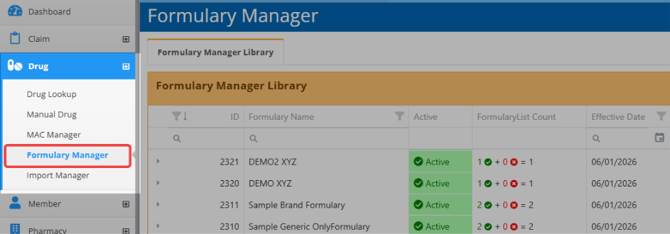
The Formulary Manager Library will appear on the screen showing all active formulary lists.
Formulary Manager Library Grid
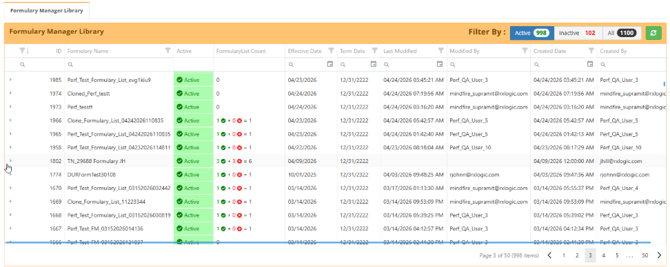
The Formulary Manager Library has the following columns:
- ID - shows the unique system generated ID# that is automatically assigned when a new formulary list is created.
- Formulary Name – shows the formulary list name.
- Active – indicates the formulary list status based on the specified effective and term dates.
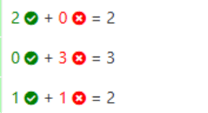
- Formulary List Count – shows the total number of drugs in the list, including the number or active (green) and inactive (red) drugs based on the configured effective and term dates for each drug.
- Effective Date - indicates the effective date of the formulary list.
- Term Date - indicates the termination date of the formulary list. If left blank, the formulary list will be active from the effective date onward.
- Last Modified - indicates the date and time the formulary list was last updated.
- Modified By - indicates who last updated the formulary list.
- Created Date – indicates when the formulary list was created.
- Created By – indicates who created the formulary list.
Quick Action Buttons

The Formulary Manager has the following quick action buttons in the top right corner:
- Show Where Used – from a specific Formulary List opens a pop-up window that shows configurations utilizing the selected formulary list.
- Import Formulary – opens the Import Manager screen where you can add new formulary lists using a formulary import file.
- Create New Formulary List – opens a new formulary list configuration screen that you can configure from scratch.
- Clone – allows you to duplicate a formulary list configuration, to create a new formulary list or template.
- Export – from the Formulary Manager Library screen saves a list of all formularies to an Excel file.
- Export – from a specific Formulary List saves a list of all drugs in the formulary Drug Library to an Excel file.
Disabled buttons are enabled in the Formulary List screen.
Filter Formulary Lists by Status
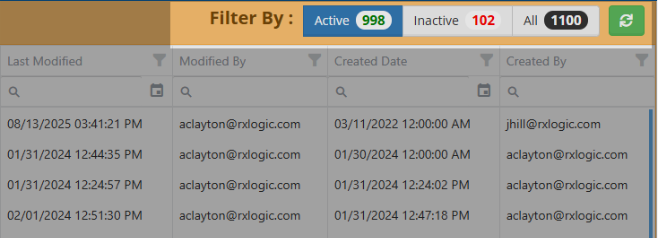
You can filter the grid view to display just the active, inactive, or all formulary lists by using the Filter By: options in the top-right corner of the library. The Active option is set by default, which only shows the active formularies in the Formulary Manager Library grid. To display only inactive formularies, select Inactive. To display all formularies regardless of their status, select All.
Search, Sort and Filter Formulary Manager Library Grid
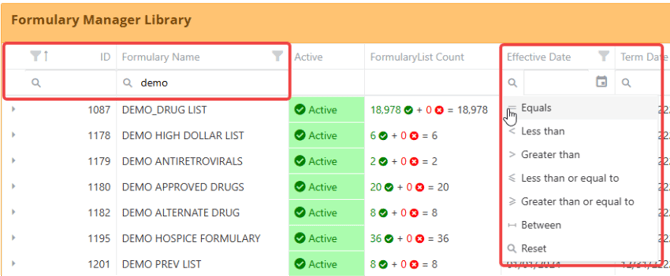
To sort, search or filter the library, you can use the available column header options at the top of the grid.
Find Lists Containing NDC or GPI
You can search for formulary lists that contain a specific drug using its NDC or GPI number.
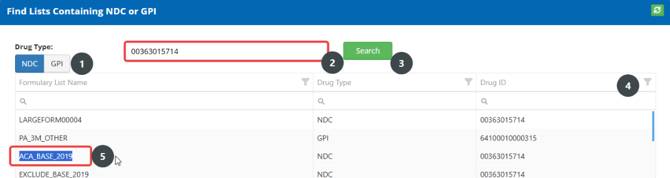
To search for a formulary list by drug:
- Select either the NDC or GPI from the Drug Type options.
- Enter the full NDC or GPI number in the search field.
- Click Search to display all matching formulary lists in the search results grid below.
- Use the column header options to sort, filter and search the search results grid as needed.
- Highlight the formulary list name from the search results grid to copy it.
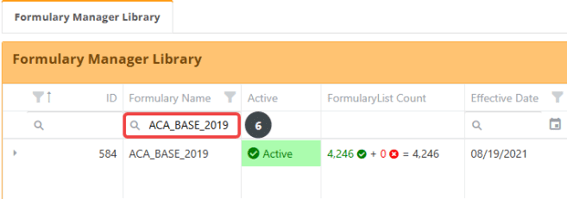
- Paste the formulary list name in the Formulary Manager Library grid’s Formulary Name column header search field to locate the formulary list in the grid.
Formulary List Overview
View Formulary List Details
There are two ways to view a formulary list’s details where you can add, update or delete drug lines:
- Click on a formulary list from the Formulary Manager Library to open the Update Formulary List screen to view, add, update, or delete drug lines in the selected formulary.
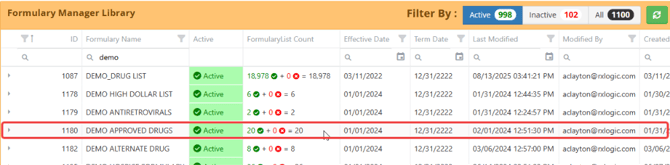
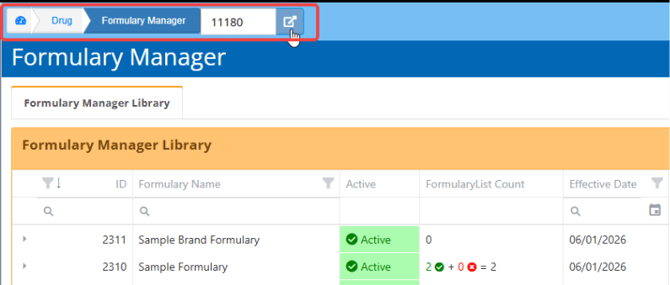
- If the formulary list ID# is known, you can enter it in the Jump-to-ID field on the top left of the Formulary Manager screen, then click the Go-To button.
Formulary List Details
The Title Bar shows the current formulary list’s name and ID#. You can click the green back button to return to the Formulary Manager Library screen.
 The Formulary List section has the following fields:
- Formulary List Name – used to label or identify the formulary list.
- Effective Date – specifies when the formulary list is active.
- Termination Date – specifies when the formulary lists active status ends.
Quick Action Buttons
The top right corner of the screen has the following quick action buttons:

- Save – applies any changes or updates made to the Formulary List. Fields labeled in red are required and must be completed before the formulary list can be saved.
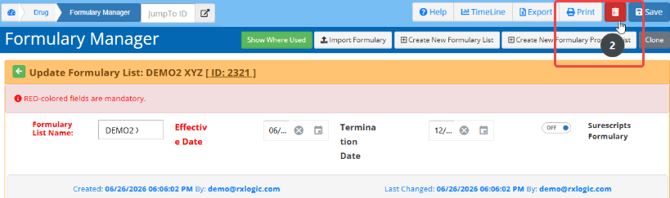
- Delete – deletes the formulary list from the Formulary Manager Library.
- Clone – allows you to duplicate a formulary list configuration, to create a new formulary list or template.
- Create New Formulary List – opens a new formulary list configuration screen that you can configure from scratch.
- Import Formulary – opens the Import Manager screen where you can add new formulary lists using a formulary import file.
- Show Where Used – opens a window that lists all plans and process rules currently using the formulary list.
- Export – saves a list of all drugs in the formulary Drug Library for the selected formulary list to an Excel file.
Formulary Drug Section
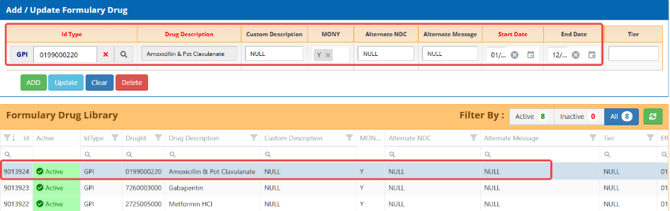
The Add/Update Formulary Drug section is used to add or update drug details in the Formulary Drug Library directly below it.
The fields are automatically populated when a drug is selected from the Formulary Drug Library. The Update and Delete buttons will also be enabled when a drug is selected.
 Drugs can be added to the Formulary List using NDC, GPI (Partial or Full) or DDID.
The Formulary Drug section has the following fields:
- ID Type – field name identifies the ID Type of the value in the field.
- GPI (partial or full)
- NDC
- DDID
- Drug Description – automatically populated based on the ID type value.
- Custom Description – optional free-text label for internal reference. Maximum 255 characters.
- MONY – Optional Multi-Source Code filter. When specified, the entry applies only to drugs with the matching MONY code (M,O,N,Y).
- Alternate NDC – alternate NDC shown to the pharmacy when the drug in the formulary list is recognized during claims processing. Maximum 12 characters.
- Alternate Message – An optional message associated with the Alternate NDC. Maximum 255 characters.
- Start Date – The date the formulary drug entry becomes effective
- End Date – The date the formulary drug entry expires. Leave blank for an open-ended entry.
- Tier – A numeric tier value assigned to the drug entry, used in benefit design and member communications.
Formulary Drug Library
The Formulary Drug Library displays all drug entries for the currently loaded formulary list.
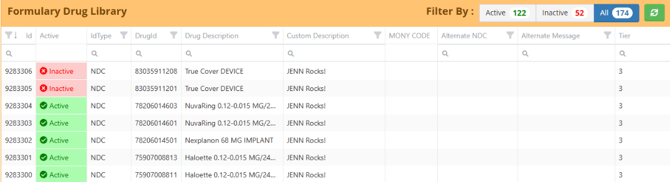
The Formulary Drug Library has the following columns:
- ID - shows the unique system generated ID# that is automatically assigned when a new formulary drug is added to the formulary list.
- Active – indicates the formulary list status based on the specified effective and term dates.
- ID Type – identifies the ID Type of the value in the Drug ID field
- Drug ID – shows the Drug ID number.
- Drug Description – shows the drug name, strength, and dosage form of the corresponding Drug ID.
- Custom Description – shows the optional free-text label for internal reference.
- MONY Code – indicates specified MONY code filter(s) (M, O, N, or Y) if set for formulary drug line.
- Alternate NDC – shows the alternate NDC if set for formulary drug line that is returned in pharmacy messaging.
- Alternate Message – shows alternate message if set for formulary drug line that is returned in pharmacy messaging.
- Tier – shows tier value if set for formulary drug line.
The Formulary Drug Library has the following quick action buttons in the top right corner:
- Filter By Options
- Active – show only active formulary drugs
- Inactive – show only inactive formulary drugs
- All (Default) - shows both active and inactive formulary drugs
- Refresh – reloads the library grid to show latest updates.
Select a drug from the Formulary Drug Library grid to show its configuration in the Add/Update Formulary Drug section.
Create New Formulary List
There are two ways to add new formulary lists to the formulary manager library.
You can create a new formulary list and add formulary drugs manually, or use a formulary import file to add and/or update multiple formulary lists at a time.
Follow the steps below to create a new formulary list manually.
- Click Create New Formulary List in the top right corner to open the Create New Formulary Screen.

- Complete the required fields. Providing a termination date is recommended.
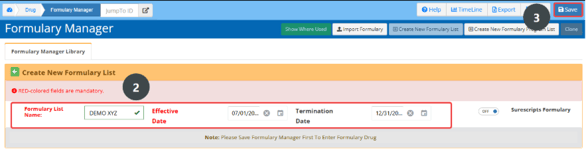
- Click Save to create the Formulary List, and the Formulary Drug section will appear.
- Complete the required fields in the Formulary Drug section.
- Click Add to add a new Formulary Drug to the Formulary Drug Library.
- Add more drugs as needed, then click Save to update the Formulary List.
Add Formulary Drug
The Add/Update Formulary Drug’s ID Type is set to NDC by default. Other ID Types are available when the Drug Search function is used to populate the ID Type field.
Manual NDC Entry
- Enter the drug NDC in the ID Type.
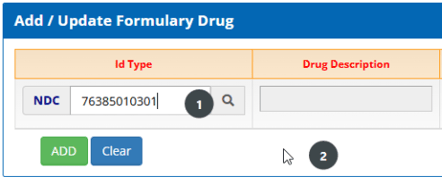
- Click on any empty space to load the NDC value and populate the Drug Description field.
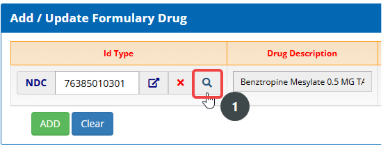
- Additional buttons will appear in the ID Type field.

- Drug Lookup – opens the Drug Lookup screen with the drug’s details.
- Clear – deletes the ID Type value and clears the field.
- Enter the Start Date. Complete the other fields as needed.
- Click Add to save the drug to the Formulary Drug Library.
Drug Search
Follow the steps below to use the drug search function which will automatically populate the ID Type field, instead of entering the NDC manually.
- Click ID Type field’s Lookup button to open the Drug Search window.
- Select a Drug Type option.
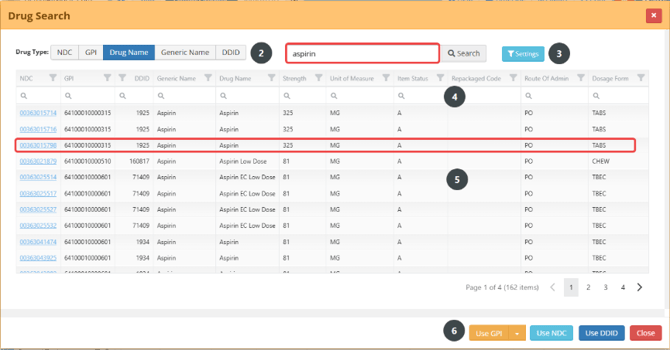
- Enter search terms in the field, then click Search. Click Settings to add more search criteria.
- Use the column header options to sort, filter, or search the results in the grid.
- Select a drug record from the grid.
- Click an ID Type option (GPI, NDC or DDID) in the bottom right to populate the ID Type field in the Add Formulary Drug section.
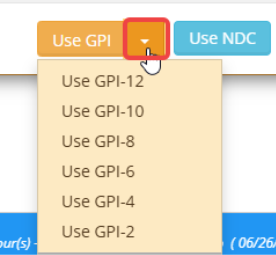
The Use GPI option has an additional dropdown button that lets you select partial GPI values which broadens the scope of drugs that will be included in the Formulary Drug Library. - After selecting a record and selecting an ID Type, the ID Type field will be populated with the corresponding ID Type value.
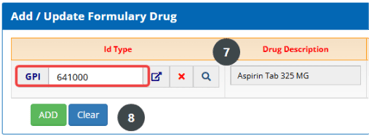
- Click Add to save the drug to the Formulary Drug Library.
Delete Formulary Drug
- Select a drug from the Formulary Drug Library. This will populate the Formulary Drug section’s fields and options.
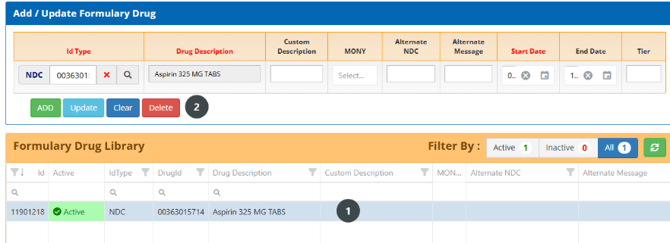
- Click Delete in the Add/Update Formulary Drug section.
- Click Yes, Delete it! To confirm.
Import Formulary List
You can add new formulary lists to the Formulary Manager Library using a formulary import file. The formulary import file lets you add or update multiple formulary lists at the same time.
Formulary Import Template
The formulary import template file provides the values and formatting required to import formulary list data into the Formulary Manager Library.
- Click Import Formulary in the top right corner of the screen. This will open the Import Manager screen.

- Click the green Download Formulary Import Template link to download the file.
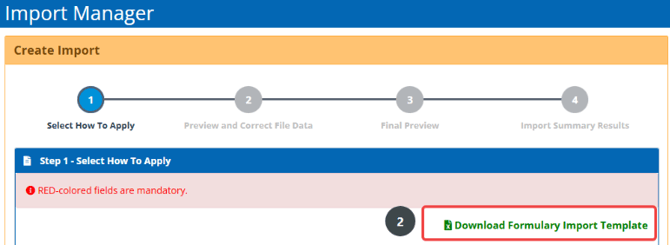
- Use template to create a formulary import file containing the data you want to import into the Formulary Manager Library.
Formulary Import File
The Formulary Import File has the following columns:

- FormularyName – enter the name of the formulary list that the line item on import applies to.
- If the Formulary Name in the import file already exists in RxLogic that formulary will be updated.
- If the Formulary Name in the import file does not exist in RxLogic, it will be created during the import process.
- DrugIdType – enter the ID Type of the value in the Drug ID field (NDC, GPI or DDID).
- DrugId – enter the Drug ID value.
- DrugDescription – enter the drug name, strength, and dosage form of the corresponding Drug ID.
- StartDate – enter the date the formulary drug entry becomes effective.
- EndDate – enter the date the formulary drug entry expires. Leave blank for an open-ended entry.
- MonyCode – enter specified MONY code filter(s) (M, O, N, or Y), if applicable, for the drug line.
- AltNDC – enter alternate NDC if applicable that will be returned to pharmacy.
- AltNDCMessage – enter an alternate NDC message, if applicable, that will be returned to the pharmacy.
- Tier – enter Tier value, if applicable, to the drug line.
- CustomDescription – enter the drug’s free-text label for internal reference, if applicable.
Import Formulary List
Follow the steps below to import new formulary list data into the Formulary Manager Library using a formulary import file.
- Click Import Formulary in the top right corner of the screen. This will open the Import Manager screen.

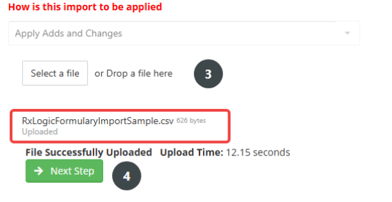
- Select an import option from the dropdown.
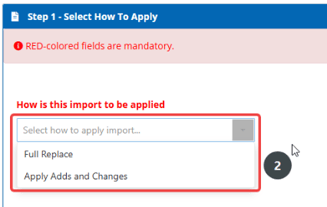
- Full Replace – Choosing the “Full Replace” option will overwrite all existing data currently on the List and only leave the records being imported as the List. All historical pricing support will be lost and unable to be recovered.
- Apply Adds and Changes - Choosing the “Apply Adds and Changes” option will add all new records (records that don't exist in the List) with the data being submitted, and then also apply special logic to process the record changes on records that already exist on the List. If a record already exists in the List, the termination date will be updated on the existing record and set to the day before the effective date on the new record. A new line will be created for the new record with the new start date and apply the new Price value.
- Drag and drop the import file into the download area or click Select a File to locate the file in your local folders.
- Click Next Step to proceed.
- Review file data in the Formulary Preview and Correct File Data grid.
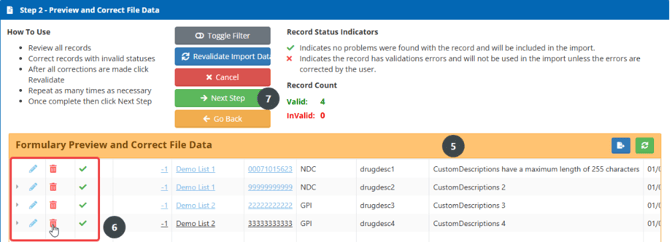
- Click the Edit or Delete buttons to update the formulary list(s) import records.
- Click Next Step to proceed.
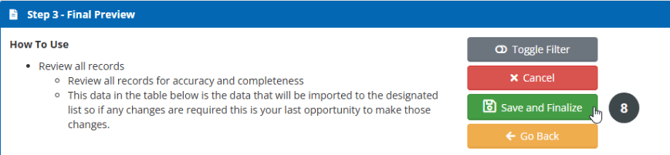
- Review the records in the Final Preview grid, then click Save and Finalize to proceed.
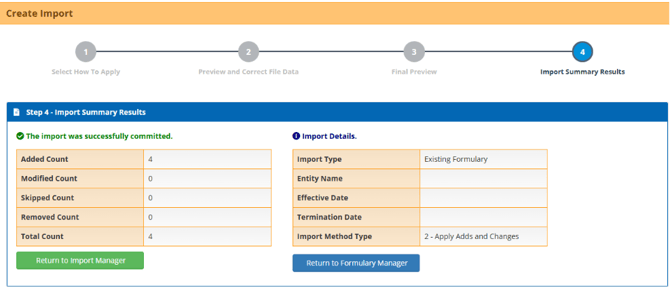
- Review the Import Results Summary.
Clone Formulary List
The Clone Formulary List option allows you to duplicate a formulary list configuration, to create a new formulary list or template.
- Select a Formulary List from the Formulary Manager Library.

- Click Clone in the top right corner of the Update Formulary List screen.
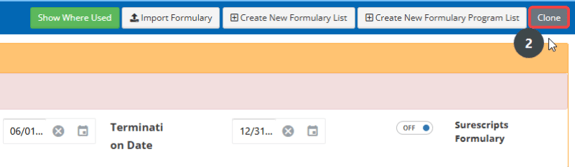
- Enter New Formulary List Name.

- Click Clone to make a copy of the existing Formulary List. If the formulary name entered already exists, you will get a popup message.

Delete Formulary List
Follow the steps below to remove a formulary list from the Formulary Manager Library.
Note: Before deleting a formulary list, click the Show Where Used button to determine if the formulary list is currently in use. If it is, do not delete formulary list.
- Select a Formulary List from the Formulary Manager Library to open the Formulary List screen.

- Click the Delete button in the top right corner.
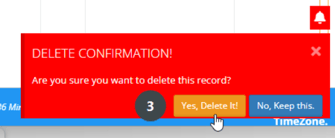
- Click Yes, Delete It! To confirm.
What would you like to learn about next?