Process Rules can be attached to different plan configurations to provide additional customizability and flexibility that is typically not available with default configuration options. A process rule can contain multiple configurations each with distinct conditions in a specific order that control rule triggering.
This guide will provide you with an overview of the Process Rules screen and its configuration options.
Open Process Rules Library
To open the Process Rules Library screen:
- Click on Rules & Calculators in the left navigation menu.
- Select Process Rules from the dropdown.
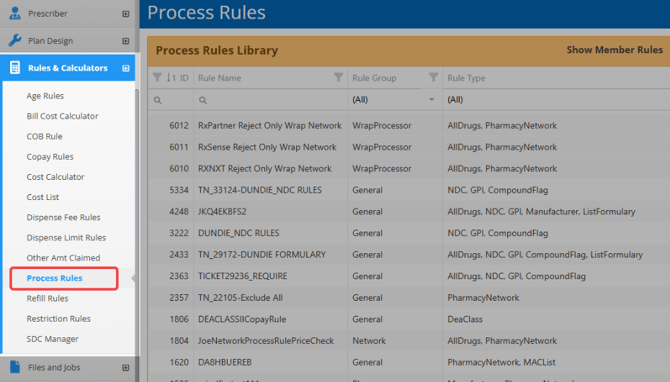
The Process Rules Library will appear on the screen showing all existing process rules.
Process Rules Library Grid
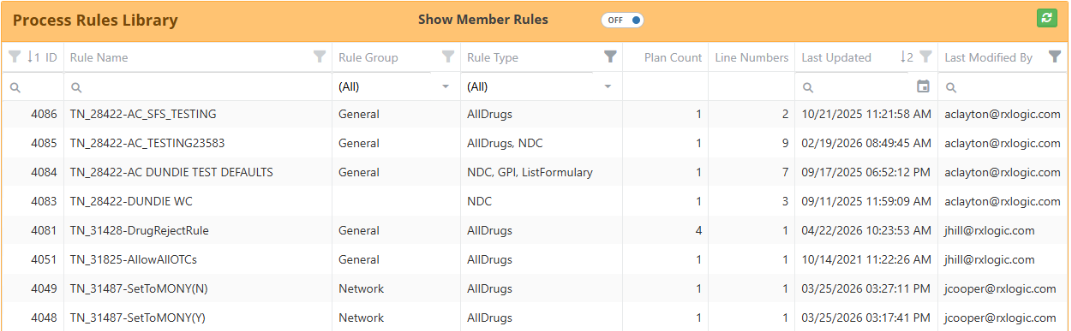
The Process Rules Library has the following columns:
- ID - shows the unique system generated ID# that is automatically assigned when a new process rule is created.
- Rule Name – shows the process rule name.
- Rule Group – category assigned to the process rule.
- Rule Type – specifies one or more matching criteria used to trigger the process rule.
- Plan Count – indicates the number of plans currently using the process rule.
- Line Numbers – lists the number of process rule configuration lines within the process rule.
- Last Update – date the process rule was last modified.
- Last Modified By - indicates the user who last updated the process rule.
Quick Action Buttons

The Process Rule Library has the following quick action buttons in the top right corner:
- Create New – opens a new process rule configuration screen that you can configure from scratch.
- Help – opens the Knowledge Center
- Export – saves the Process Rule Library to an Excel file.
Disabled buttons will be enabled when a Process Rule screen is opened.
Search, Sort and Filter Process Rule Library
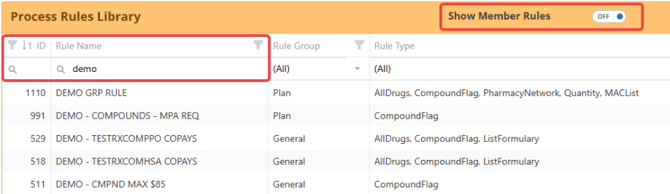
Use the available column header options at the top of the grid to sort, search, or filter the library.
Switch the Show Member Rules toggle on to only show process rules with a Member Rule Group.
View Process Rule Details
There are two ways to view a process rule’s details where you can update or delete the record:
- Select a process rule from the Process Rule Library to view, update, or delete it.

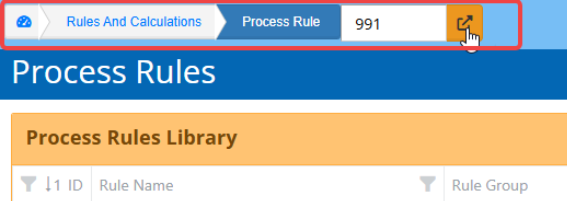
- If the process rule ID# is known, you can enter it in the Jump-to-ID field on the top left of the Process Rule screen, then click the Go-To button.
Process Rule Details
Quick Action Buttons

Additional quick action buttons are available in the top right corner of the Process Rule screen:
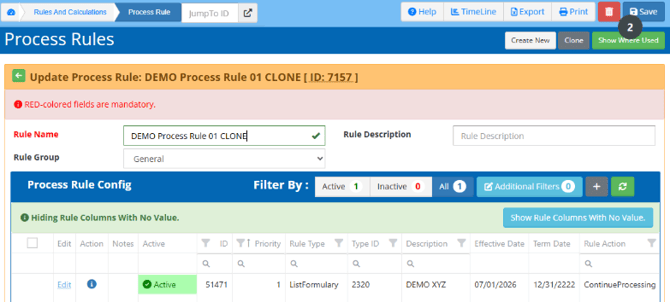
- Clone – creates a duplicate of the process rule’s configuration that you can rename and use as a template.
- Show Where Used – opens a window listing all plans currently using the process rule.
- Save – applies any changes or updates made to the process rule. Fields labeled in red are required and must be completed before the process rule can be saved.
- Delete – deletes the process rule from the Process Rules Library.
Process Rule Details Section
The Title Bar shows the current process rule’s name and ID#. You can click the green back button to return to the Process Rule Library screen.

The Process Rule name section has the following fields:
- Rule Name – used to label or identify the process rule.
- Rule Description – provides additional details about the process rule configuration and purpose.
- Rule Group – specifies the process rule’s category to aid with grouping, sorting, and identification.
- General – general use category.
- Plan – plan specific configurations.
- Network – pharmacy or prescriber networks.
- Global – special rule that applies to all plans in the entire database and does not need to be attached to a plan design configuration.
- Fee Schedule – applies to state fee schedules for worker’s compensation.
- Member – applies to member configurations.
- Wrap Processor – applies to rules for external adjudication systems.
Process Rule Config Section

The Process Rule Config section has the following quick action buttons in the top right corner:
- Filter By Options
- Active – show only active process rules
- Inactive – show only inactive process rules
- All (Default) - shows both active and inactive process rules
- Additional Filters – displays a window where you can add search filters for matching actions found in the process rule config’s Action tab.
- Plus (+) - Create new process rule config line.
- Show/Hide Rule Columns With No Value – shows or hides empty columns from the grid.
- Refresh – reloads the process rule config grid to show latest updates.
The Process Rule Config grid has the following columns:

- Checkbox – lets you select one or more process rule configs. An additional Delete button will appear when a checkbox is selected.
- Edit – opens the Update Config screen where you can update the process rule line’s configuration.
- Action – click the Info icon to open a window displaying all actions enabled in the Action tab, and rules configured in the Rules to Apply section of the Config tab.
- Notes – click the Notes icon if available to show additional information from the Notes tab.
- Active - indicates the process rule’s status based on the specified effective and term dates.
- ID - shows the unique system generated ID# that is automatically assigned when a new process rule config line is added to the grid.
- Priority – indicates the rule’s position in the priority order.
- Rule Type – indicates the matching criteria used to trigger the rule.
- Type ID – specifies the value required to trigger the rule for the associated rule type.
- Description – shows additional details about the process rule from the description field of the Matching Criteria section.
- Effective Date – indicates the effective date configured in the Config Details section.
- Term Date – indicates the term date configured in the Config Details section.
- Rule Action – indicates the Rule Action configured in the Config Details section.
- Action Count – indicates the number of actions enabled in the Actions tab.
- Rules to Apply – additional rule columns will appear if rules are configured in the Rules to Apply section.
Rule Config Overview
Click Edit to open an existing process rule’s configuration screen or click the Plus (+) icon in the top right corner to add a new rule to the process rule config grid.

The Process Rule Config screen’s Title Bar displays the process rule configuration line’s Rule Type and ID#, followed by the Process Rule Name and ID#. You can click the green back arrow to return to the Process Rule screen.
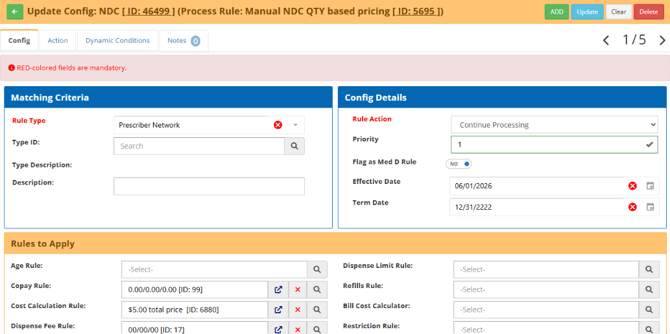
The Process Rule Config screen has four tabs:

- Config – define the primary rule settings, including the rule type, matching criteria, rule actions, rules to apply, and message settings.
- Action – configure additional actions and option toggles.
- Dynamic Conditions – add custom matching criteria.
- Notes – view or enter supporting details for the process rule configuration line.
The following Quick Action buttons are available in the top right corner:
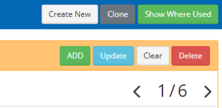
- Add – creates a new process rule configuration line using the current values and options.
- Update – saves any changes made to the existing configuration.
- Clear – removes the current configuration line’s settings and values.
- Delete – deletes the current process rule configuration line.
- Back – shows the preceding configuration line in the grid.
- Forward – shows the next configuration line in the grid.
Config Tab
The Config tab contains the process rule configuration line’s primary configuration details and is divided into several sections.
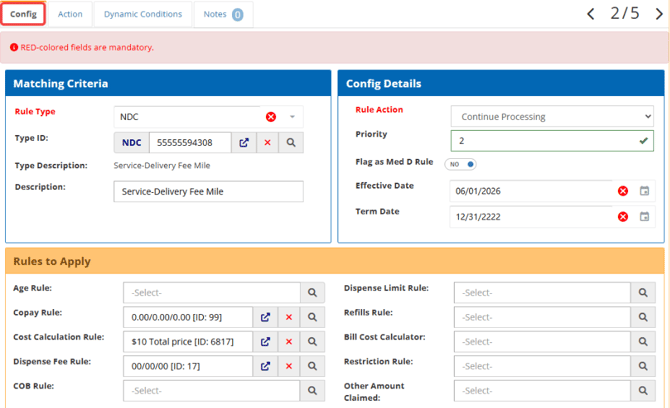
The Matching Criteria section has the following fields:
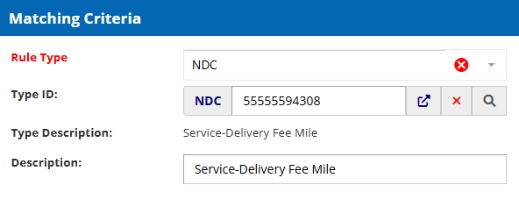
- Rule Type – indicates the matching criteria used to trigger the process rule configuration line.
- Type ID – specifies the value required to trigger the rule for the associated rule type. The available fields and options will vary depending on the selected Rule Type from the dropdown list.
- Description – provides additional details about the process rule configuration and purpose.
The Config Details section has the following fields:
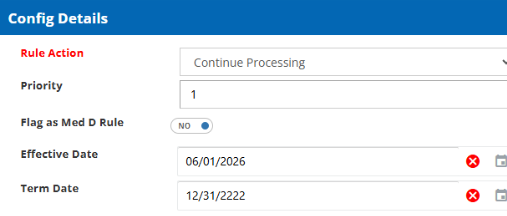
- Rule Action – specifies the operation that the system performs when the matching criteria is met.
- Continue Processing – executes the rules and actions in the process rule configuration line.
- Exclude Always – rejects the claim.
- Include Always – executes the rules and actions in the process rule configuration line and forces the claim to be included, overriding or ignoring other exclude rules later in processing.
- Priority – specifies the configuration line’s position in the priority order and determines the sequence in which lines are evaluated or processed. The first found matching rule in priority order is used, then the rest of the process rule is skipped. Only one configuration line in a single process rule can be used in processing.
- Flag as Med D Rule – flags the rule as Medicare Part D.
- Effective Date – specifies the date the rule configuration becomes active, based on DOS.
- Term Date – specifies the date the configuration becomes inactive, based on DOS.
- Return Message – sent if the line is set to Continue Processing or Include Always and the line is used.
- Reject Message – sent when the claim is rejected on the line if set to Exclude Always.
- Additional Message – sent to the pharmacy in a separate line.
The Rules to Apply section shows all rules and calculators that the process rule will use when it is triggered.
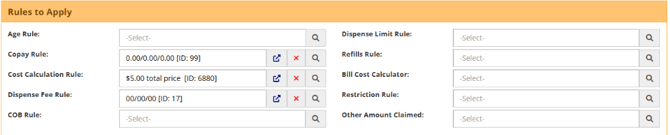
Each rule field has the following buttons:
- Lookup – opens a rule library window where you can search and select from available options.
- Go To – opens the specified rule’s configuration screen.
- Clear – removes the specified rule from the process rule configuration.
The Go To and Clear buttons are enabled when a field is populated.
The Summary of Actions section displays all configured Actions and Dynamic Conditions from their respective tabs, along with their configuration details if available.
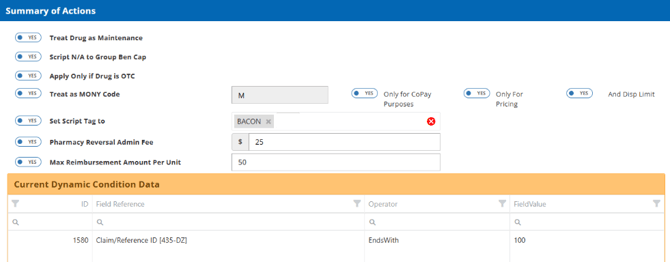
The Message to Pharmacy section contains optional messages that can be sent to the pharmacy when the process rule is triggered.

- Return Message – sent if the line is set to Continue Processing or Include Always and the line is used.
- Reject Message – sent when the claim is rejected on the line if set to Exclude Always.
Action Tab
The Action tab contains additional actions or options that the system can apply when the claim is processed.
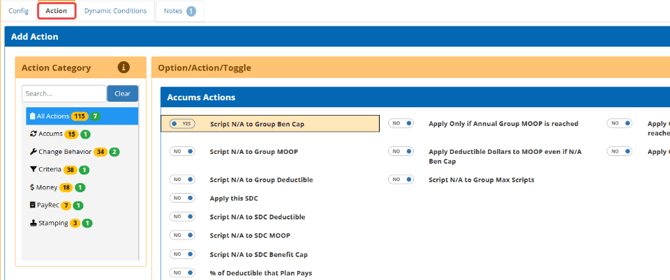
The Action Category section on the left provides quick access to the different action groups on the right.
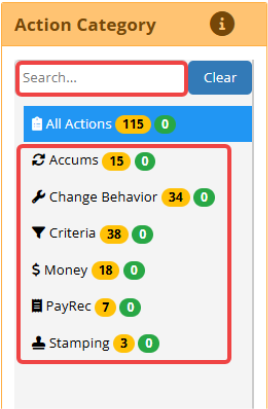
You can enter keywords in the search field to filter the actions displayed on the right side of the screen.
Click the Category Titles to show or hide specific action sections.
The number of available and enabled actions for each section are highlighted next to each category title.
- Yellow – available actions
- Green – enabled actions
The Action Toggle section groups related actions into the following sections:
- Accums – contains actions related to accumulators (MOOP, SDC, benefit cap).
- Change Behavior – contains actions that change how a claim processes.
- Criteria – contains additional matching criteria conditions.
- Money – contains actions that affect fees, billing, drug pricing, copays, and reimbursements.
- PayRec – contains actions that affect payables and receivables.
- Stamping – contains actions that add tags, tiers, or flags to the claim.
Switching a toggle to Yes enables an action. Some toggles have additional fields and toggles that need to be completed.
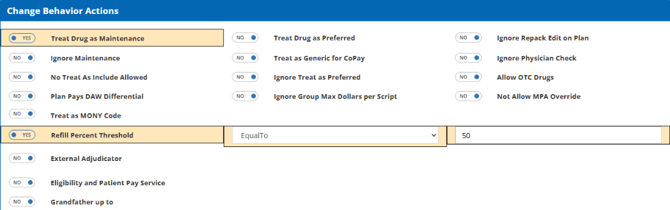
Enabled actions are highlighted in orange.
Dynamic Conditions Tab
The Dynamic Conditions tab contains additional matching criteria.
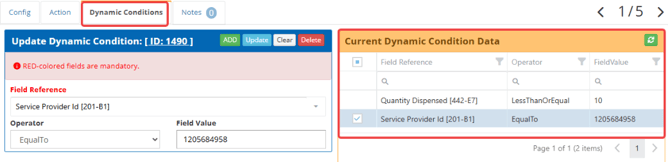
The Current Dynamic Condition Data section on the right contains all existing dynamic conditions for the process rule configuration line. If there are multiple dynamic conditions on a process rule line, they operate as AND logic.
Select an existing dynamic condition on the right to populate the fields on the left.
The following quick action buttons are available in the top right corner of the dynamic condition configuration section:
- Add – adds a new dynamic condition to the process rule using the current field values.
- Update – updates the selected dynamic condition with the current field values.
- Clear – empties the dynamic condition fields.
- Delete – removes the selected dynamic condition from the list.
- Edit – populates the Add New Note section, where you can modify and update the current text.
- Delete – removes the note from the timeline.
Notes Tab
The Notes tab contains additional information and supporting details for the process rule configuration line. The number of existing notes is indicated next to the tab’s label.
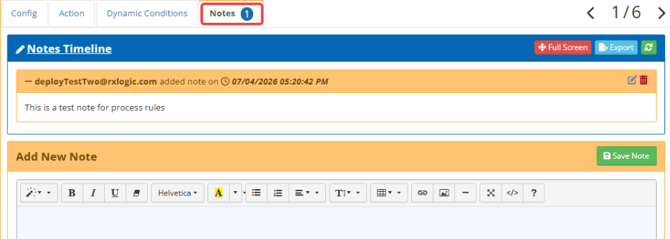
The Notes Timeline section contains all existing notes. Each note includes the creator’s username and the date it was created.
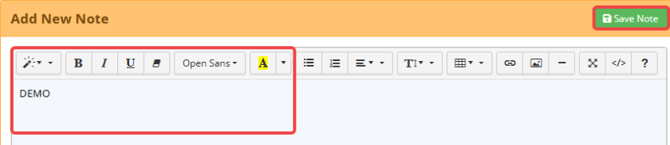
To add a new note to the timeline, enter a note in the text box, then click Save Note.
Quick action buttons are available on the top left corner of each note:
- Edit – populates the Add New Note section, where you can modify and update the current text.
- Delete – removes the note from the timeline.

Create New Process Rule
- Click Create New in the top right corner to open the Create New Process Rule Screen.

- Enter a Rule Name. The Rule Description is optional.
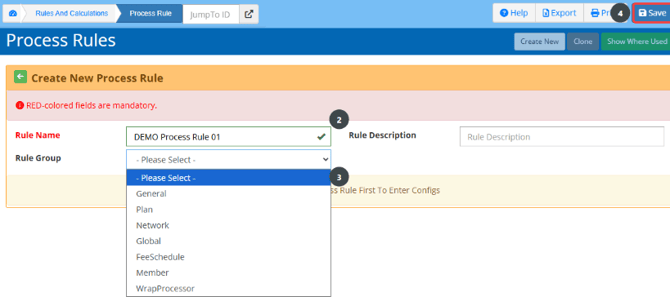
- Select a Rule Group from the dropdown list.
- Click Save to create the Process Rule and add it to the Process Rule Library. The Process Rule Config library will appear below the process rule name section.
- Click the Plus (+) icon to add a new process rule configuration line. This will open the Create New Configs screen.

- Complete the required fields in the Matching Criteria and Rule Action sections. Use the dropdown lists to select from the available options.
The Priority field is automatically populated based on the number of existing process rule configuration lines. The priority number can be modified as needed.
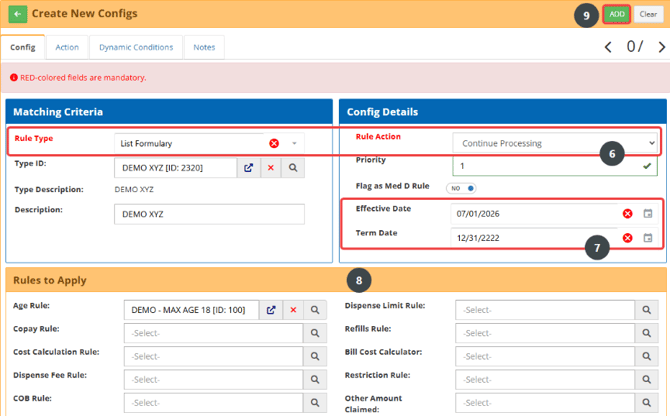
- Enter the Effective and Term Date.
- Complete the other fields and tabs as needed.
- Click Add to create the new process rule configuration line and add it to the Process Rule Config list.
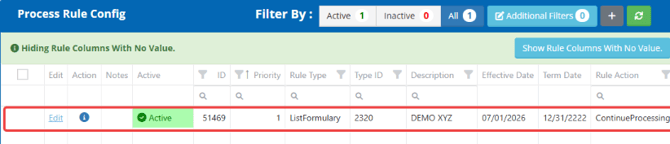
- Add more configuration lines as needed.
- Click Save to apply any changes made to the process rule.
Clone Process Rule
- Select a Process Rule from the Process Rules Library to open its configuration screen.

- Click Clone in the upper right corner of the Process Rule screen.
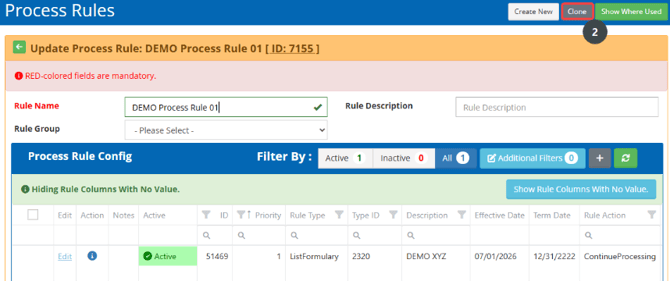
- Enter a new Rule Name.
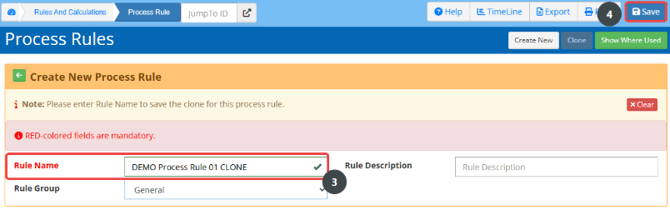
- Click Save to create the new process rule.
- Update the process rule configuration as needed.
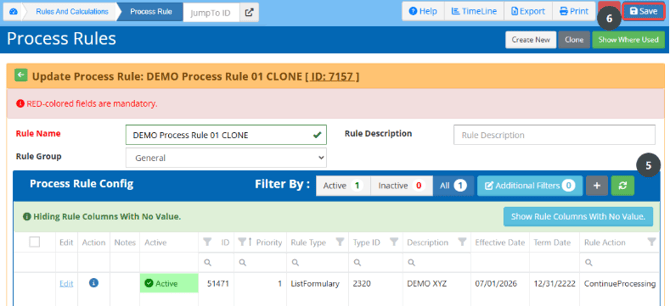
- Click Save to apply any changes made to the cloned process rule.
Delete Process Rule
- Select a Process Rule from the Process Rules Library to open its configuration screen.

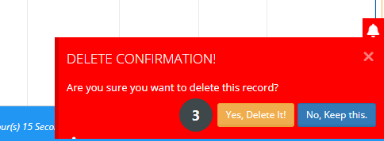
- Click Delete to remove the process rule from the Process Rule Library.
- Click Yes, Delete It! to confirm.
What would you like to learn about next?