A Claim Cycle flags billable claims submitted for a specified period. When a billing cycle job runs, the flagged claims are compiled into a billing cycle export file. This file is then uploaded to the PayRec module to generate receivables and payables files.
When you create a new entity, whether it is an organization, carrier, or group, its claim and billing cycle schedule configurations must be properly set up in the Billing Manager.
After completing the claim and billing cycle setup, claims associated with the new entity will be included in subsequent billing cycle export files.
This guide walks you through the process of setting up a Claim Cycle Schedule for an entity. After following the steps in this guide, read How to Set Up a Billing Cycle guide to complete the configuration steps required to generate a billing cycle export file.
Open Billing Manager
To open the Billing Manager, follow these steps:
- Click on Billing and Fee Management in the left navigation menu.
- Select Billing Manager.
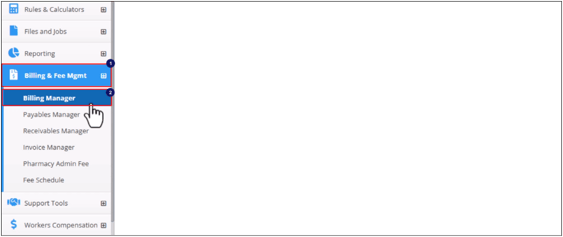
The Billing Manager screen will appear showing all the billing records.
Setting Up a Claim Cycle
Hierarchy Selector
The Hierarchy Selector shows the same hierarcy structure found in the Hierarchy Detail under Plan Design.
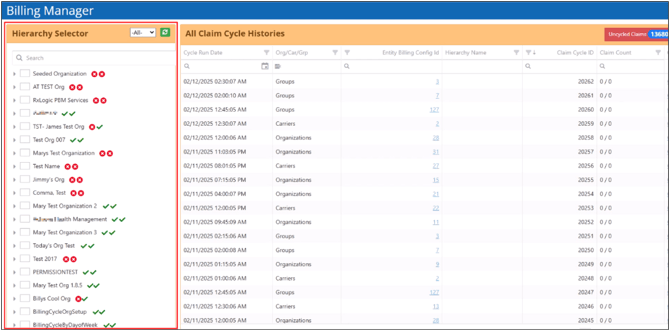
Display Hierarchy
Click on the Arrows at the left of each item to view carriers under an organization and groups under a carrier.
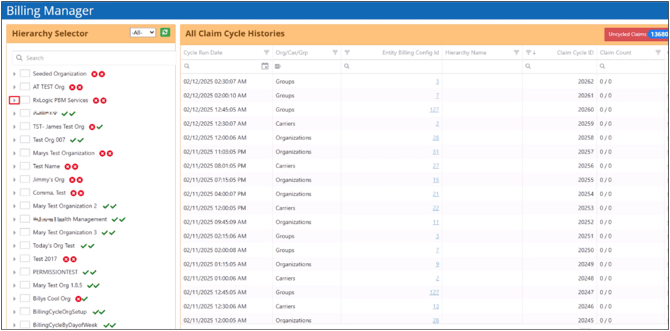
Check if an Entity’s Claim and Billing Cycle has been Configured
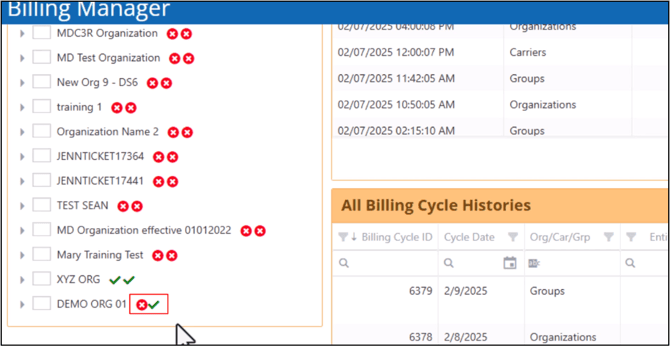
The Check and X icons at the end of each entity’s name indicate whether its claims and billing cycle settings have been previously configured. The first icon is for the billing cycle, while the second is for the claim cycle.
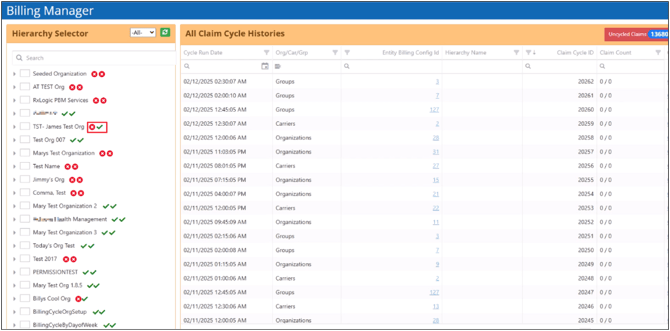
Please note that once the Billing Manager, and the claim and billing cycle schedules are configured for an entity that is higher up in the hierarchy, the entities below it will follow the same configuration.
You can also specify the claim and billing cycle schedule at the entity level, so it won’t follow the same cycle configuration of the entities above it in the hierarchy.
Open Entity’s Billing Cycle Configuration
To open an entity’s billing cycle configuration screen, select the checkbox to the left of its name.
If an entity’s billing cycle configuration has not been previously set up, only the Hierarchy Cycle tab will appear.
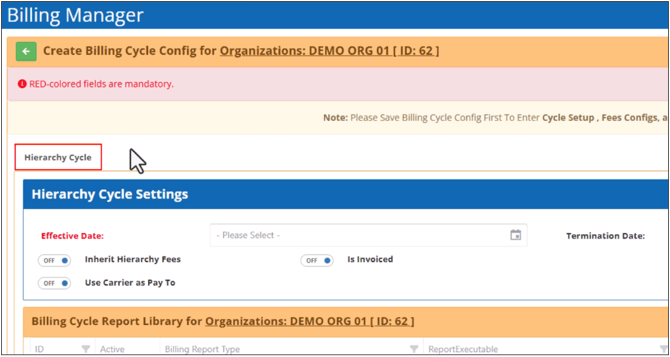
Once the hierarchy cycle configuration has been saved, more tabs for the claim and billing cycle settings will appear.
Set Up Claim Cycle Configurations
Configure Hierarchy Cycle
- Under the Hierarchy Cycle tab, enter the Effective Date for the entity’s cycle settings in mm/dd/yyyy format or pick a date from the calendar.
- You can enter a Termination Date (Optional).
If it is left blank, the configuration will remain active from the effective date onward. - Switch on the Inherit-hierarchy-fees toggle to apply the same fees configured for entities higher up in the hierarchy structure.
- Switch on the Is Invoiced toggle to create invoices for claims associated with the entity.
This will also allow you to enter an invoice due date and select how the claims are invoiced using the grouping invoicing option. - After configuring the hierarchy cycle settings, select Save on the top right corner of the screen.
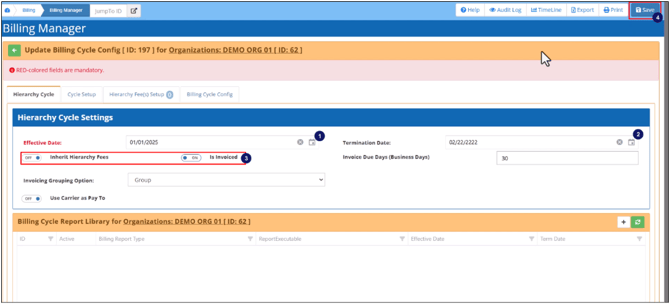 This will save the current configuration and additional tabs for Cycle Setup, Hierarchy Fees Setup and Billing Cycle Config will appear.
Add a Billing Cycle Report
In the Hierarchy Cycle Settings, you also need to configure the Billing Cycle Report. When the billing cycle export file is generated, the Billing Cycle Report configuration will determine the output files for a receivables batch.
If the Billing Cycle Report Library is empty, the entity’s output folder will be created but no output files will be generated.
Similar to how cycle schedules apply to entities lower down the hierarchy, a higher-level entity’s Billing Cycle Report settings will also cascade to the entities under it. You can also specify billing report configurations at the entity level.
- Click on the Plus (+) sign in the top right corner of the Billing Cycle Report Library.
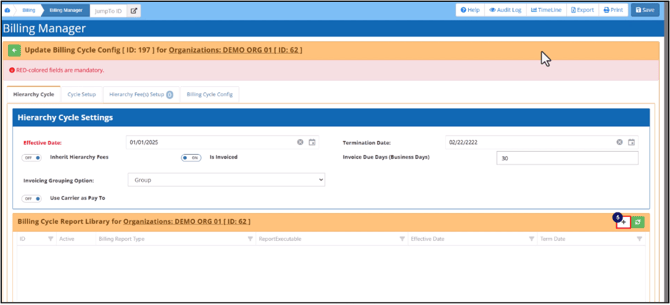
This will open a configuration screen right below the library where you can specify the type of reports and the files that will be created. - Select the report type from the dropdown list.
When choosing Receivables, you can specify which file types will be generated by the batch job using the toggle switches in the lower half.
For Payables, the file type options are pre-configured in the system. - Select an executable from the dropdown list.
- Enter the Effective Date.
- Enter a Termination Date (Optional).
Leaving it blank makes the report configuration active from the effective date onward. - Click Add to save the configuration and add it to the library.
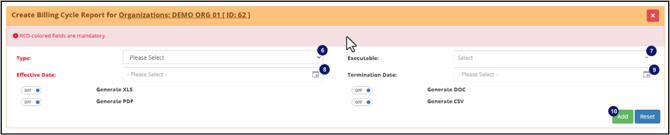 You can add multiple report configurations to the library depending on your use case.
Configure Cycle Setup
- Next, switch to the Cycle Setup tab to configure the Claim Cycle Schedule.
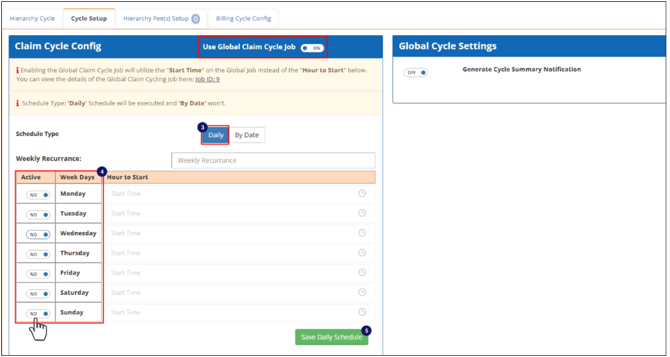
By default, the Use-Global-Claim-Cycle-Job toggle is switched on and the entity’s claims are included in the global claim cycle job. The global claim cycle job runs daily and processes the uncycled claims for all entities that are scheduled for the day. When it is switched off, you will also need to specify the time the claim cycle job will run for the selected day or date. - Switch the schedule type to Daily or By Date.
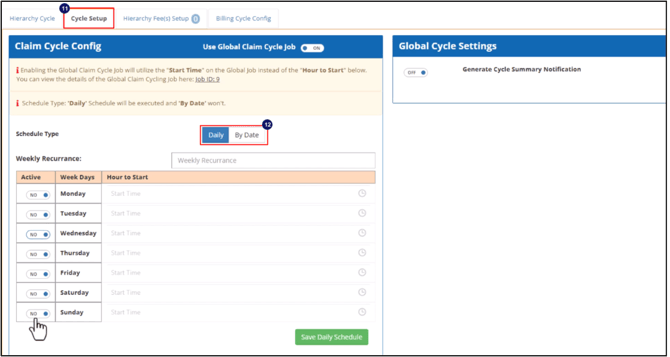
Schedule Type: Daily
- When the Daily option is selected, you can choose which days of the week the entity’s claims will be processed.
If the Global toggle is switched off, you also have to specify the time the claims will be cycled on the selected days. When manually selecting the time, it is best to avoid using 12 midnight as the start time.
If you are configuring individual entities to cycle claims on the same date, you also have to stagger the start times so that they don’t all run at the same time. For example, one entity can have a start time of 12:15 while the next one runs at 12:30. - Click ‘Save Daily Schedule’ on the bottom right to save the claim cycle configuration.
Schedule Type: Date
- If you select the date option, you can specify which days of the month the claims will be cycled.
In most cases, claims are cycled on the 1st and 16th of the month. Switching off the Global toggle will also require you to select the time the claim cycle job will run. - Click Add on the bottom right to apply the specified dates to the claim cycle schedule.
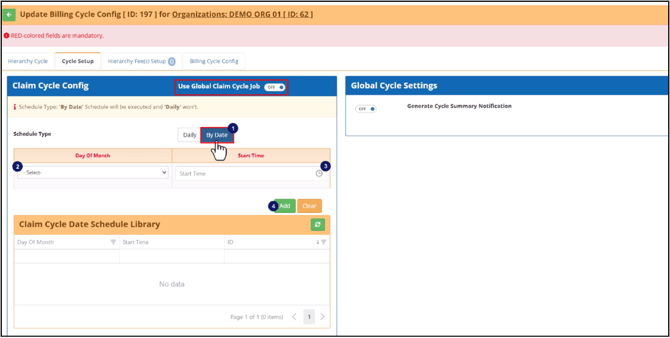
After configuring the claim cycle schedule, the Claim Cycle History grid in the lower half of the screen will eventually be populated with the jobs that have run based on the schedule you configured.
Automatically Send Email Notifications to a Distribution List
On the right side of the screen, you can switch on the Summary Notification toggle to automatically send email notifications to a distribution list whenever the selected criteria is triggered.
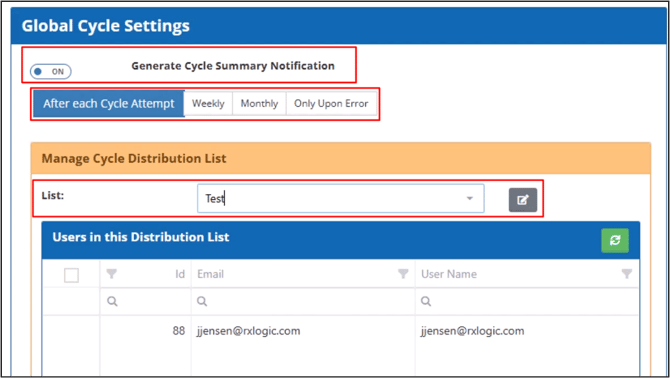
You can choose either after each cycle attempt, weekly, monthly or only when an error occurs when the job is run.
Save Configuration
After completing the necessary configuration steps, select Save on the upper right.
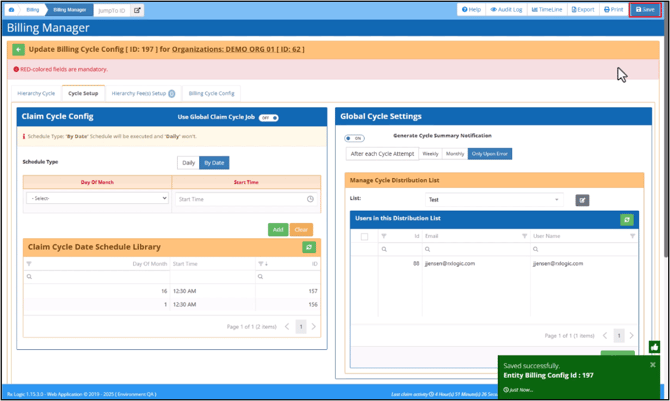
When you refresh or reload the Billing Manager screen, the icon for the entity’s claim cycle schedule in the Hierarchy Selector will be updated with a Green Check.
Once the claim cycle configuration is saved, you can set up the billing cycle schedule using the Billing Cycle Config tab to complete the process.