Transaction Details Overview
The Transaction Details module enables you to find and view claim transactions with different search parameters. A claim’s transaction details provide a complete overview of the data submitted in the claim, the claim processing results, and the claim’s transaction status.
These additional details provide a comprehensive view of various aspects of the claim transaction from start to finish, allowing you to troubleshoot errors and see how different configurations affect claim processing.
These additional details give a clearer picture of the claim processing steps, allowing you to troubleshoot errors and test configurations.
This guide demonstrates how to navigate the Transaction Details screen and make the most of its features.
Open the Transaction Details
To open the Transaction Details screen:
- Click on the Claim in the left navigation menu.
- Select Transaction Details from the dropdown.

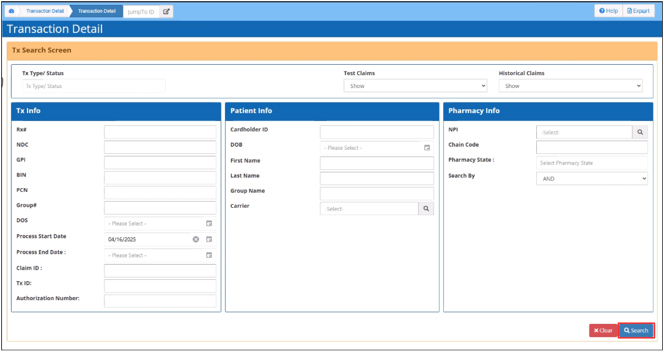
The Transaction Details screen will appear on the screen, divided into three sections grouping the related search fields together.

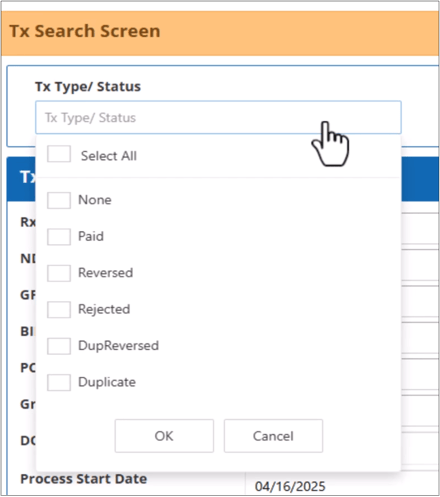
Search Transactions By Status
Select a Transaction Status from the Tx Type/Status dropdown list and click OK.
Transaction Information
The Transaction Info section enables you to enter the claim details such as prescription number, drug codes, bin and PCN numbers, group number, claim and transaction IDs, and the authorization number.
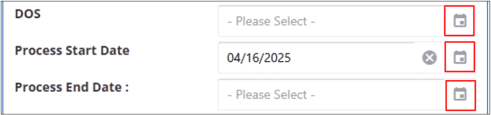
The Date of Service (DOS) refers to the date on which the pharmacy filled the prescription.
Filling in the Date Fields
You can fill-in any date field, click on the Calendar icon in the corresponding field and select a date.
Alternatively, you can enter the date manually in mm/dd/yyyy format.
The Process Start and Process End Dates let you find transactions on the claim processing date.
View Transactions from Oldest to the Selected End Date
If you leave the Process Start Date field blank, all the transactions from the oldest up to the selected end date will be included in the search.
View Transactions from Selected Start Date to the Most Recent
If you leave the Process End Date field blank, all the transactions from the selected start date to the most recent ones will be included in the search.

Patient Information
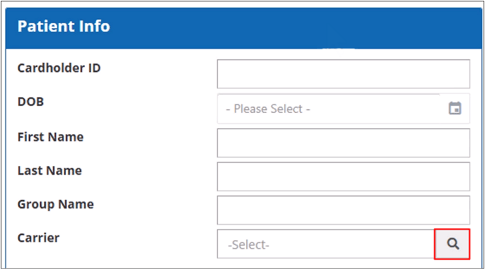
The Patient Info section contains the fields to search the transactions using the member details like the cardholder ID, date of birth, first and last name and group and carrier names.

Accessing Lookup Windows
By clicking on the Magnifying Glass icon, you can access the field’s corresponding lookup window to choose a list of existing records.
Accessing the Carrier Library
Clicking on the Magnifying Glass in the Carrier field opens the carrier library. By default, this shows all the carriers.

Filter Carriers
With the help of the Filter-By option in the top right corner allows you to view only active or inactive carriers.

Opening the Carrier Manager
By clicking on the highlighted links, the Carrier Manager opens in a new browser tab.

Sort, Search and Filter the Grid
The options in the column headers enable you to sort, search and filter the grid.

Include a Carrier in the Search
- Select one or more carriers through the checkboxes in the left side of the row.
- Click Add button in the bottom right.

Open Carrier Details
- Select a carrier from the grid.
- Click on the Go-To button beside the magnifying glass.

Clear a Carrier
- Select a carrier from the grid.
- Click on the Cross (X) button beside the magnifying glass.

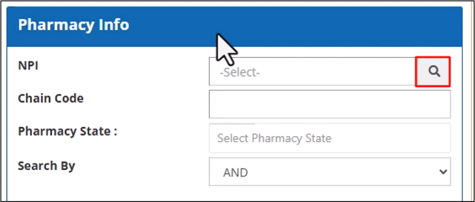
Pharmacy Information
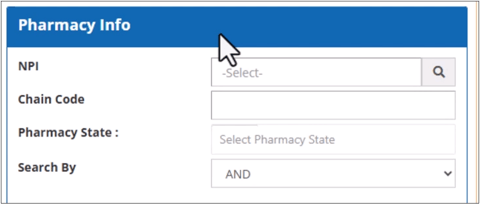
The Pharmacy Info section allows you to search for the transactions by the claim’s pharmacy details, like the NPI number, chain code number, and state.
Open Provider Info Library
By clicking the Magnifying Glass at the end of the NPI field, you can access the Provider Info library.
Search, Sort and Filter Provider Info Library
You can use the column headers to search, sort and filter the grid. Once a provider has been selected, the NPI field is automatically populated.

Selecting Pharmacy States
- Select the states by selecting the checkboxes.
- Click OK.
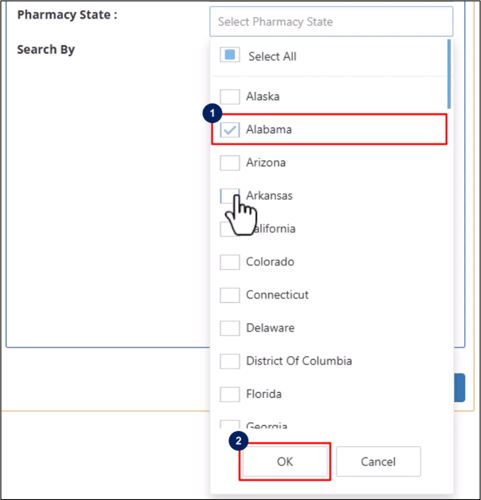
You can also type in the state name in the field and select the available options.
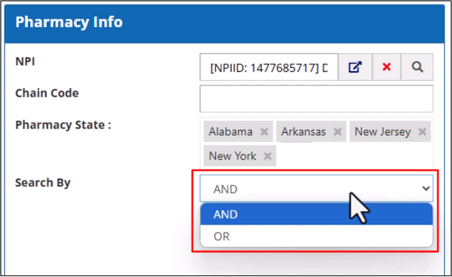
Using Search-By Field
The Search-By field allows you to choose a search operator using the dropdown menu. The following are the available options:
AND - Includes transactions that contain all of the specified search terms in the results.
OR - Includes transactions that contain at least one of the search terms.
Running the Search
After filling in all the desired fields, click on the Search button to perform the search.
Clearing Search Fields
Click on the Clear button at the bottom right to clear all the search fields to start over.

Navigating the Transaction Search Results Window

Transaction Status Column
The Transaction Status column highlights the paid claims in the following color codes:
- Paid Claims: Highlighted in Green.
- Rejected Claims: Highlighted in Red.
- Historical or Reversed Claims: Highlighted in Orange.
- Test or Duplicate Claims: Highlighted in Yellow.
- Duplicated Reversed Claims: Highlighted in Light Orange.
- Paid Claims and Paid Amounts: Highlighted in Green.
- Reversed Amounts: Highlighted in Red.
Reject Code and Description Column
The Reject Code and Description column provides more details about the rejected claims.
Access Record Configuration Details
Click on the highlighted links to open the Record’s Configuration Details in a new browser tab.

View More Transaction Details
Access more details about transactions by scrolling horizontally.
Show or Hide Columns
- Click on the Column Chooser button at the top right corner of the grid.
- Select the columns to show or hide.

Search, Sort and Filter Transaction Search Results
You can use the options in the grid’s column header to filter, sort and search the records.

Reset Filters and Sorting
Click on the Reset-Filters-and-Sorting to remove the specified search filters and reset the grid to view all transactions sorted from latest to oldest.

Export Transaction Details
Click on the Export button in the top right corner of the screen to export the transaction details grid as an Excel file.

Access Transaction Details Screen
Click on a transaction from the grid to open the Transaction Details screen in a new browser tab.
Navigating the Transaction Details Screen
The Transaction Details screen is divided into multiple sections.

Title Bar
The Title Bar shows the transaction and transmission ID.

Go to a Transaction Without Performing a Search
- Enter the Transaction ID in the Jump-to-ID field in the top left corner of the Transaction Details screen.
- Click on the Go-To button.

Action Buttons
The buttons in the top right corner of the screen allow you to view the claims in other parts of the application, such as the ticket tracker, paid claim lookup, or claim processing.

You can create a new Member Prior Authorization (MPA) with the Create MPA button using the GPI or NDC code submitted in the claim.
With the Claim Adjustment button, you can change the buy and sell-side pricing amounts, accumulators, and pay-to details.
Compound Details
The View Compound Details shows the compound drug’s ingredient cost and other billing information.

Status Section
The Status section to the right of the title bar and overview shows the final status of the transaction after claim processing.

This section follows the same color codes as the transaction status column of the search results grid to highlight the transaction’s status. It also shows the total amount paid to the pharmacy and the claim and billing cycle dates.
The additional flags also appear in the top right corner of the status section if the claim is for a compound drug, self-pay, keyed-in, imported from an external adjudicator, or exempt from payables.
More details, such as the plan, cardholder, drug, pharmacy and prescriber info, are shown in the separate sections below the status overview.

Open Record’s Configuration Screen
Select the highlighted links to open the Record’s Configuration Screen in a new browser tab.

View Member’s Claim History
By clicking the Clock button next to the Cardholder ID link, you can view the member’s claim history.

You can also use the Arrow icon to filter the claim history by NDC and GPI.

View Claim’s Transaction History
The Yellow expand button on the left displays the claim’s transaction history.

Action Buttons
The options under the Action column allow you to view claim history in different parts of the application.

View Other Claim Types Associated With the Member
You can select the tabs at the top to view the details of other claim types associated with the member.

Process Rules
The lower half of the Transaction Details screen shows the Process Rules that were triggered when the claim was processed. The right column shows whether the rule was configured in the Plan Default rules or as a Process rule.

Access Claim’s Drug and Price Details
Click on the Blue bar at the bottom right corner of the screen to expand a window that contains a summary of the claim’s drug and price details.

Transaction Response Tab
The Transaction Detail screen opens a Transaction Response tab when opened. This tab shows the values returned by the system after the claim has been processed. These values are also sent back to the pharmacy. The left column shows the labels and descriptions for the transaction values in the right column.

Copy Raw Data
To copy raw NCPDP data to the clipboard, click on Copy Raw Data.

View NCPDP Data
Clicking on the Raw Data button opens a window that displays the tab’s NCPDP data.

Nested View
To group related response data into different sections to make them easier to find, switch the Nested View toggle On.

In the nested view, you can select a segment’s title to expand it and display more details regarding the data.
Transaction Info Tab
The Transaction Info tab shows the values submitted by the pharmacy. You can use the Copy Raw Data and Raw Data buttons and the Nested View toggle that work the same as the Transaction Response tab.

Transaction Rules
This tab displays the claim processing steps from beginning to end. The Rule Tracker grid is automatically filtered and updated as you type search terms in the search field.

Nested View
The Nested View toggle in this tab groups related processing lines into different stages, arranged in chronological order.

Total Lines
The Total Lines indicates the total number of processing steps executed for the transaction.

Hide Warning Toggle
The Hide Warning toggle shows or hides the lines that produced a warning message.

Hide Skipped Lines Toggle
The Hide Skipped Lines toggle shows or hides processing lines that were bypassed.

Line Column
The Line column assigns numbers for each processing step or line in chronological order.

Rule Column
The Rule column shows the rule the system used for each line.

Event Type Column
The Event Type column categorizes the system’s responses for each line, with more information provided in the Detail column.

The Green lines indicate the lines that trigger pricing events. The rejected events are highlighted in Blue and warning events in Yellow.
Open Process Rule Manager
To open the Process Rule Manager in a new browser tab, click on the process rule’s link in the Detail column. Please note that this can only be done if the claim triggers a process rule.

The Info icon opens a window that shows an overview of the process rule configuration.

By switching on the Nested View toggle, you can group the lines into stages. Each stage has an overview of the processing time and a total event count.

To expand a stage and show the triggered rules, select the stage’s label.

When a rule generates multiple lines, each line is included in the event count tally. An event count of zero indicates that the system did not generate any response for the rule.
Each rule shows its processing time details. To expand it and display individual event lines, select a rule. The event type and detail show the same information available in the basic view. The nested view adds a timestamp column for each event line. To open or view the Process Rule Configuration, switch to the Basic view and find its event line.
Related Transactions Tab
The Related Transaction tab shows the claim’s transaction history. The number next to the tab name indicates the total number of related transactions for a claim. The Current Transaction is highlighted in Yellow. The Paid Amounts are highlighted in Green and the Reversed Amounts in Red.

Search, Sort And Filter Related Transactions
If a claim has multiple transactions, you can use the column header options to search, sort and filter the grid.

Accumulators Tab
The Accumulators tab lists all accumulators that were applied and their corresponding amounts. The number next to the tab name indicates the total number of accumulators.

Search, Sort And Filter Accumulators
With the help of column header options, you can sort, filter and search the grid. You can also use the dropdown lists to filter the results.

The Medical/Rx dropdown allows you to filter accumulators based on whether they are for prescriptions or other medical expenses.
The Accum Type dropdown allows you to filter accumulators based on type and whether it counts towards the member out of pocket, deductible or benefit cap.
If a Special Deductible & Cap rule was used, its code will appear in the SDC Code column.
Go Back to Transaction Search Screen
By clicking the Back Arrow, you can remove the grid and go back to the transaction search screen.

View and Edit Current Search Configuration
By scrolling up the page, you can view and edit the current search configuration.
What would you like to learn about next?