The Transaction Message Manager allows the user to configure custom transaction messages that are returned to the pharmacies during the adjudication process. Transaction Messages are applied during the adjudication process based on the matching Criteria set on the messages.
In this guide, you will learn how to navigate the Create New Transaction Message and Update Transaction Message Details screens as well as how to use the features and options.
Open Transaction Message Manager
To open the Transaction Message Manager screen:
- Click on the Claim in the left navigation menu.
- Select Transaction Messages from the dropdown.

The Transaction Messages Manager will appear on the screen displaying the Transaction Message Manager Library grid which contains all transaction messages that have been created. Existing messages can be edited and new ones created

Transaction Message Manager Library Grid
The Message ID field contains the system generated unique ID# that is automatically assigned when a new transaction message is created.
The Transaction Status field indicates the type of transaction that will trigger the message.
-
A - Accepted Reversal
-
D - Duplicate Paid
-
S - Duplicate Reversal
-
P - Paid
-
R - Rejected Claims
-
? - Unknown
The Active column indicates if the transaction message is currently active in the system based on the specified effective and term dates on the message.
The Effective Date indicates the effective date of the transaction message.
The Term Date indicates the termination date of the transaction message. When blank, message is active indefinitely.
The Reject Code indicates the rejection code that the message will be applied to during the adjudication process.
The Organization indicates that the message will only be applied to transactions under the organization displayed during the adjudication process. When blank, message will be applied to all transactions based on the rest of the message criteria options set.
The Carrier indicates that the message will only be applied to transactions under the carrier displayed during the adjudication process. When blank, message will be applied to all transactions based on the rest of the message criteria options set.
The Group indicates that the message will only be applied to transactions under the group displayed during the adjudication process. When blank, message will be applied to all transactions based on the rest of the message criteria options set.
The Chain Code indicates that the message will only be applied to transactions under the chain code displayed during the adjudication process. When blank, message will be applied to all transactions based on the rest of the message criteria options set.
The BIN indicates that the message will only be applied to transactions under the BIN displayed during the adjudication process. When blank, message will be applied to all transactions based on the rest of the message criteria options set.
The 1st MessageSegment and 2nd MessageSegment display the respective message(s) that will be returned to the pharmacy during the adjudication process. When blank, no message will be returned for that segment.
The Last Modified By indicates who last edited the transaction message configuration.
The Last Modified Date indicates the date and time the transaction message configuration was last updated.
Filter Transaction Messages
You can filter the grid view to display just the active, inactive, or all transaction messages by using the Filter-By options in the top-right corner of the library. This Active option is set by default, which only shows the active transaction messages in the grid. To display just the inactive messages, click on the Inactive Filter By option. To display all messages regardless of their status, click on the All Filter By option.

Search, Sort and Filter Messages
To sort, search or filter the library, you can use the corresponding options in the column headers of the grid.

Open, View and Edit Transaction Message
To open and view a transaction message, click on a message in the Transaction Message Manager Library grid. This opens the Transaction Message Details screen for the selected message.

To edit a message, use the red X’s to remove a current selection, then use the magnifying glass icons to access the relevant library and select another option from it where applicable. Use the drop-down menus on the Transaction Status and Reject Code options to update them. Enter updated information in text fields. Once you have made all the desired changes, click on the Save button in the upper right corner to save the changes made.

Duplicate a Transaction Message
- Open a transaction message you want to use as a template.
- Click on the Clone button in the upper right corner, this opens the Create New Transaction Message screen populated with the information from the message you cloned from. Make the desired modifications to the new message and then click on the Save button in the upper right corner to save it.


Create a New Transaction Message
To create a new transaction message
Open the Transaction Message Manager screen
- Click on the Claim in the left navigation menu.
- Click on Transaction Messages from the dropdown.
- Click on the Claim in the left navigation menu.
- Click on the Create New option in the upper right corner of the Transaction Message Manager screen. This opens the Create New Transaction Message blank configuration screen.
Configure the rules and conditions to trigger the transaction message in the Criteria section.
- Transaction Status is a required field. Select the type of transaction from the drop-down menu that will trigger this message.
-
A - Accepted Reversal
-
D - Duplicate Paid
-
S - Duplicate Reversal
-
P - Paid
-
R - Rejected Claims
-
? - Unknown
-
Please note that if you select Rejected Claims, you can also choose a specific reject code from the drop-down menu that will trigger the transaction message.
- Organization Code is an optional field. Click on the magnifying glass icon to open the Organization Detail Library. To select an organization, click anywhere on the line that isn’t a hyperlink. The message will only be applied to transactions under the organization attached during the adjudication process. When blank, message will be applied to all transactions based on the rest of the message criteria options set.
- Carrier Code is an optional field. Click on the magnifying glass icon to open the Carrier Library. To select a carrier, click anywhere on the line that isn’t a hyperlink. The message will only be applied to transactions under the carrier attached during the adjudication process. When blank, message will be applied to all transactions based on the rest of the message criteria options set.
- Group Number is an optional field. Click on the magnifying glass icon to open the Group Library. The message will only be applied to transactions under the group attached during the adjudication process. When blank, message will be applied to all transactions based on the rest of the message criteria options set.
Please note that you can specify an entity for each hierarchy level (Organization, Carrier, Group) that follows the same hierarchy structure as configured in the Plan Design. Otherwise, the transaction message will never trigger since no submitted transactions will have the matching combination of the entities as configured.
- Pharmacy Chain Name/Code is an optional field. Click on the magnifying glass icon to open the Chain# Library. The message will only be applied to transactions under the chain code attached during the adjudication process. When blank, message will be applied to all transactions based on the rest of the message criteria options set.
- BIN is an optional field. Enter the BIN number in the BIN field you want to limit the message to. The message will only be applied to transactions under the BIN entered during the adjudication process. When blank, message will be applied to all transactions based on the rest of the message criteria options set.
Please note to send a transaction message solely based on the transaction status, you can leave the optional fields empty.
Configure the custom messages and phone number you want to send in the Message to Send section.
- 1st MessageSegment is an optional field with a max of 160 characters. The message entered will be returned to the pharmacy during the adjudication process. When blank, no message will be returned for the segment.
- 2nd MessageSegment is an optional field with a max of 160 characters. The message entered will be returned to the pharmacy during the adjudication process. When blank, no message will be returned for the segment.
Please Note: Each message segment has a 160-character limit. The entire message might not be visible to the pharmacy if it is too long, since the messages are displayed with NCPDP D.0 messages. Moreover, ensure to avoid creating duplicate messages with the same information found in the D.0 messages.
- Help Desk Phone Number is an optional field with a max of 10 characters. The phone number entered will be returned to the pharmacy during the adjudication process. When blank, no phone number will be returned.
Configure the messages effective and term dates in the Other Info section.
- Effective Date is a required field. Date can be manually entered in mm/dd/yyyyy format or by clicking on the Calendar icon in the Effective Date field and selecting a date.
- Termination Date is an optional field. Date can be manually entered in mm/dd/yyyyy format or by clicking on the Calendar icon in the Effective Date field and selecting a date. This date specifies when the transaction message’s active status or validity period ends. If left blank, the transaction message remains active indefinitely from the effective date onwards.
- Message ID is auto-populated when you click the Save button.

- Click on the Save button to save the new transaction message or update the existing one.

Delete a Transaction Message
- Open a message and click on the Trash icon in the top right corner.

- Click ‘Yes, Delete it’to confirm deletion.

You can also cancel the deletion process by selecting ‘No, Keep this’.
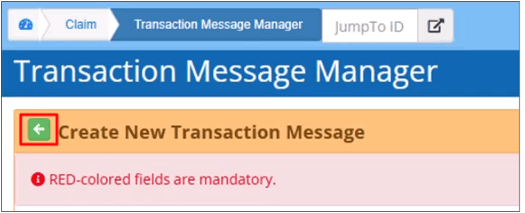
Return Back to Transaction Message Manager Library
Click on the Green Back Arrow to return to the Transaction Message Manager Library.
What would you like to learn about next?